Monday, January 30, 2012

The best way to "Desktop" browse the internet on a Samsung Galaxy S2


A long while back Scott explained a way in which he was able to browse the internet with his Samsung Galaxy S2 with a desktop display with the phones stock browser. Sadly though it seemed as if he'd been lucky as many people left comments explaining that they couldn't find the options that he had available and had shown how to use. As a result he advised people to try different browsers namely "Skyfire" and "Boat Browser", and we've come to the conclusion that using "Boat Browser" is probably the best option (we'll explain why at the end of this guide).

Of course before you read any further you will need to pop off to the market and quickly download "Boat Browser" (don't worry, it is free!) When you've downloaded  the browser you will notice that it's not, by default, showing pages in "Desktop" mode. Firstly you will need to press on the symbol in the bottom right hand of the screen (the icon with the 2 arrows). This will open up a 
a menu (like the image at the top of this guide) with an option saying "Set UA", this is the way in which you select "User Agent" and is the option you need to select.

After clicking on "Set UA" you will see a list of user agents popping up (like this list here) and you will see that "Android" is ticked, from this list you need to select "Desktop" instead. After clicking on "Desktop select "Done" from the bottom of the screen and refresh the page your on to see the "Desktop" version of the site.

After refreshing the page you should notice that the regular "Desktop" version of the website appears (as shown by this screen capture of the BBC homepage). After setting "Desktop" you should never have a mobile version of the site loading on you again as the phone tells the website you are browsing from a desktop browser.

So we do we prefer Boat Browser over Skyfire?
We think that the huge (and I do mean HUGE) amount of options available to users on Boat Browser is simply amazing though what we especially like is the easy in which it copes with a number of impressive tasks (like running youtube in the browser!). Personally I find it to run smoother than the other options (such as Dolphin, Skyfire and even the Stock browser) and the ease of use is something special.

You should also note that some of the other user agents can be used as Desktop browsers as well if you wish to try them out.

How to use the "Folders" in the music player of a Samsung Galaxy S2

Yesterday I showed you how to sort the songs on your Samsung Galaxy S2 into things like "Genre" or "Year" and quickly mentioned the method of sorting the songs by "Folder". Now using the "Folder" option is a bit different to using the other options as the other options take are list from the tags the songs have however the "Folder" is dependent on the actual "Folder" the songs are kept in.

To explain this in a simple way you need to go onto your PC or Laptop and look at your music folders. In my case I have folders for specific artists mainly though I also have specific folders for things like "Podcasts" and "Comedy music". Originally these were made to keep my computer slightly tidier than it would have been to have 100's of Podcasts lying around the place though when put onto the phone they serve a second purpose of grouping things together.

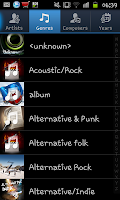
If you look at the screen shot to the left that we have here (from Scott's phone which is genuinely a mess) you'll see most of the folders just correspond to albums such as "Healthy in Paranoid Times" by Our Lady Peace and "Hot Fuss" by The Killers. Though you can also see that he has a folder called "Kaiser Chiefs", this folder just keep all the tracks by the Kaiser Chiefs in one place so that they are easy to play together (and many of the lack the correct "Artist" tag).

What you need to do on your computer to create these "Folders" is create a folder on your computer as you normally would then place all the tracks you want into the same folder. Then copy the tracks into your phones music folder.
Alternatively you could use an explorer or the "My Files" app on your phone to create new "Folders" in your main music folder on your phone to create these pseudo playlists.

How to hide your lock pattern on your Samsung Galaxy S2

Last summer we did a guide on setting up the pattern lock screen on a Samsung Galaxy S2 and since then we've learned something new about the pattern lock screen, how to "hide" your entry. Firstly you will need to set a pattern lock screen on your phone (guide to doing that can be read here) and then you need to go back to the "Location and security" settings screen (where you found the lock screen options).

When you are back in the "Location and security" menu you will notice some new options in a sub menu called "Screen unlock settings". Amongst these options is the "Use visible pattern", if you untick this check box and then lock your phone and go back to the pattern screen you will notice that the lights don't light up if you slide your finger across them.

Whilst this may seem like an unnecessary extra step it does stop people from seeing you entering your pattern and as a result it does make your phone more secure in the case of someone else getting a hold of it.

If you wish to get the lock pattern made visible again just tick the box and the visible lines will return next time you go to your lock screen.

What is the white line on my Samsung Galaxy S2 pattern lock screen?

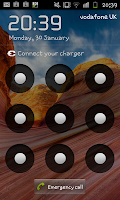
If you look carefully at this screen shot you will be able to see a faint white line on the screen between today's date (Monday, 30 January) and the alarm (Tue 7:30) and charging icons (4%). A lot of people have been talking about this on forums recently and  have been worrying about some sort of possible screen error.

If you are worried about this single white line you need worry no more as it isn't just normal but actually serves a function as it breaks up the screen to show you things that
you may wish to know about. If you look at this second screen shot you'll see that the line is still there though the screen has the "Connect your charger" warning again breaking up today's date from the message.

If you are still worried about the line you can just check any other screen on your phone and you will notice it disappears. It really is normal and not something to worry about.

So the big question is why is it being spoken about on forums now a days? Well I'm not actually sure as the line has been on the screen since we first covered the pattern lock screen back in Summer last year.

Sunday, January 29, 2012

How to sort songs on a Samsung Galaxy S2

A while ago Scott showed you all how to add music to a Samsung Galaxy S2 and now I'm going to show you how you can sort your music by Genre, Composer, Folder or even the Year. This does, in theory make it easier for you to make specialised play lists on your computer and transfer them over (which I will explain in a future guide).

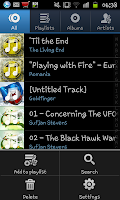
As you may expect this guide starts at the "Music" app so make sure to open up the app so you see a screen something like the one on the let handside. When you're here you need to press the phone's "Menu" button which will open up an options menu at the bottom of the screen. From this menu you will

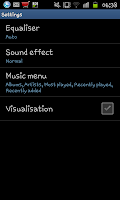
need to select "Settings" which will on up a screen with 4 more options in a list. You will be able to see options for "Equaliser", "Sound effect", "Music menu" and "Visualisation", from here select "Music menu".

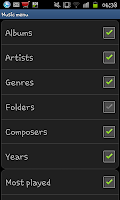
The "Music menu" should give you a list of things, such as
"Albums", "Artists" and "Genres" (see the picture on the right of this paragraph for more of the list) each with a tick box. From here you need to select the options you want to be able to use, personally I'd advise "Albums", "Artists" and "Genres" though you may wish to select "Year" if you have a particular year that you love.

When you've selected all the options you'd like to use you need to go back to your music player screen then use your finger to scroll across the options at the top. You need to scroll things like "Artist" across and you'll soon come to the new options that you added from the "Music menu".

One thing to note before you become hugely comfortable about this. If you've not sorted your music properly (like Scott who took these screenshots) you may notice that some of the Genre's, Artists and Albums  (and everything else) can be a bit of a mess to say the least.

How to get around Vodafone's "Adult content" filter

By default all phones on Vodafone have a rather annoying "Adult Content" lock which is there to prevent youngsters from getting on sites associated with pornography, gambling and other adult based websites. Whilst we understand the idea of doing this on PAYG (Pay As You Go) handsets we think it's a bit stupid to have it on contract phones so we decided to try and find a "work around"...what we didn't realise was just HOW easy it was to get around.

The first option is that you connect your phone to the internet via Wi-Fi. This actually cuts out anything to do with your network, so obviously you won't be charged "Data" for using your own Wi-Fi and in many cases you'll also likely get a quicker connection to the internet. The problem with just using Wi-Fi to get around the Adult Content is that you can't always be connected to Wi-Fi and this brings us nicely to option 2.

Option 2 is that you download the "Opera Mini" internet browser. Opera Mini, in one version or another, can be used with almost any phone capable of browsing the internet. For many smartphones you will find it on the associated "Store" or "Market" for older phones that can run Java visit http://www.opera.com/mobile/ on your PC (and see if a version is available for your phone). After installing Opera Mini you need to open it and then use it to visit a website, you should quickly realise that you can get on the previously prohibited website.

Opera Mini manages to get around Vodafone's content filter as the Opera servers actually deal with your request (as opposed to Vodafone's) this means that you are sent a website that Opera has processed (this saves you money on data as well as gets around the the pesky Adult Content warning). Rather interestingly the Chinese Government were afraid of Opera customers using Opera Mini to get around the "Great Firewall" in a similar manner to the way that users can use Opera Mini to get around Adult Content filters!

So next time you want to place a sneaky bet, look at something dirty or read up on drugs use Opera Mini.

*We do expect this to work on ANY networks using adult content filters but sadly we're unable to test at the moment

How to see SIM contacts on a Samsung Galaxy S2

Although many people currently using Android phones such as the Samsung Galaxy S2 will have most of their contacts synced via either Gmail or Facebook (or even Skype)
some people may still have numbers on their SIM card that they want to access on their phone. This guide should show you how to make the contacts from your SIM card appear in your contacts list.

Firstly you need to open your contacts list so press "Contacts" on your phone (by default it will be at the bottom of your screen along with the other "Dock" icons). After opening your contacts you will need to press the phones "Menu" button which should open up 6 options for you to select from. From these options select "More" (which is the one in the bottom right corner).

After clicking "More" you will see a long list of options popping up on your screen. From these new options you need to select on "Display options" which will be near the bottom of the screen (as you can see in the image on the right). 

After clicking on "Display options" you will be greeted by yet another menu on a whole new screen. This time the menu will be
split into 2 separate parts with the the first (top) part being 
"Display options" and the second being "Select contacts to display". You want to scroll down to the second option and then click where the screen says "SIM" (see the picture on the left if you need any help).

After clicking on "SIM" you will notice a new tick box appears along with the option of "All contacts". If you click on the box and tick it then click on "Done" at the bottom of the screen the SIM contacts will become visible on the contacts list of your phone!

Whilst this maybe fantastic if you have an old SIM card and you want to add numbers that you haven't got in other ways it can pose one or two issues of it's own. Mainly that it can replicate numbers that you may have via other means (I.e. You may have the same contacts on Facebook or on your Gmail account) so you may wish to merge those contacts into 1. Other than some minor issues however this should work perfectly.

Note-You may need Android version 2.3.5 or above (this is untested on earlier versions).

Thursday, January 26, 2012

How to blacklist numbers on Android 2.3.5

 Way back when the Samsung Galaxy S2 was released I did a guide on stopping number from calling your phone. Back then I was using an early release of Ginger (most probably 2.3.3 or even 2.3.2) and since then things have changed quite a lot with most people running 2.3.5 or 2.3.6 (if they've not already gone to Ice Cream Sandwich). This has meant the original guide (which can be read here) is now quite dated and lacks a specific step that we will cover in this guide.

Instead of changing the original article, which does still help people running early versions of Gingerbread I thought it was worth starting from scratching and making this a cover all for every phone running Android 2.3.5 (and likely 2.3.6). The
actual method isn't much different to the original guide but their are some noticeable differences so lets start with setting screen (in the top left of this guide). From the settings menu you need to select "Call" and then "Call rejection" which is a screen like the screen shot on the left of this paragraph.

From the "Call rejection" screen you need to select "Auto reject mode" this will open

up a menu with 3 options: "Off", "All numbers" and "Only black list". From here you need to select "Only black list". After this the numbers on your black list won't be able to call your phone. What is actually quite annoying is that this step wasn't there in the original version of the software so you didn't need to do that and now you do.

After you select a choice from the "Auto reject mode" menu you will go back to the previous screen with the "Black list" option. Now you can either click on "Black list" and then click "Add" then add the number you wish to blacklist. Though it can be difficult to remember a whole mobile number so what I would advise is following the original black list guide (click here) and adding the numbers to the black list via your contacts screen.


Note-When you set an "Auto reject" mode you will see a new symbol along the notification bar of a red phone, an "A" and a "No" symbol, this is to say "Calls automatically rejected". The symbol can be clearly seen on the large screen shot alongside this paragraph with a white arrow pointing towards it.

This guide should work on any phone running Android version 2.3.5 and this includes the likes of a Samsung Galaxy S2, HTC Sensation XE and many many other.

Wednesday, January 25, 2012

Gingerbread Android Easter Egg

 When this site first started it was supposed to be a site talking about phone secrets and now we have a wonderful secret Easter egg hidden on phones running the Gingerbread version of the android operating system.


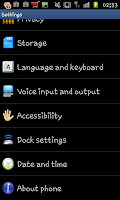
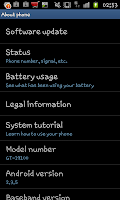
To start you need to open the settings menu on the phone which will look something like the image on left hand side of your screen. From here you need to scroll all the way down to the bottom until you come across an called "About phone". The icon alongside this option should look like an "information" symbol  as you can see in the image to the right.

After clicking on "About phone" you will see a host of options telling you about various facets of your phone and with a number of other sub menu's. From this menu you need to find the option for "Android version"...then press it...repeatedly. You need to press it around 5 or 6 times inside a second or two (so you may want to use two fingers at once as if they were legs).

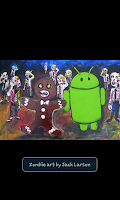
If done correctly you will see a hidden image that shows the little Green Android
surrounded by zombies. This is (as the screenshot says) an art piece by Jack Larson called "Zombie Art".

Jack's artwork can be found at www.zombieart.blogspot.com and if your a fan of Zombie based artwork it is seriously worth checking out.

Friday, January 6, 2012

Alternatives to MMS

A few years ago MMS (Multimedia Messaging Service) was going to be the thing to really make the most of Camera Phones, the quickest and easiest way of sharing your photos with a friend or a family member. Sadly it seems like the lifespan of the MMS is almost over, the high cost of the service and size limitations have effectively killed it before it became the success it was expected to be. When Camera Phones first hit the market around the turn of the century few expected phones to advance to the point where they became small and powerful mobile computers (as Smart Phones now are), it's been the move to Smart Phones that has effectively killed the MMS.

Rather than writing a long obitury of the MMS I've instead decided to look at some of the most useful alternatives to actually using MMS, something I quickly did in an old article looking at the pros and cons of using e-mail instead of MMS. Whilst it is true that E-mail is still the prefered way for some, such as myself, it's certainly not the only way, in fact their is so many different ways that I'm not even going to be able to cover them all, just the most straight forward ones.

The most widely used "third option" (behind MMS and E-mail) are the new messenger apps, things such as Whatspp? and Ebuddy XMS which allow you to send pictures, messages and other forms of media over the internet for free. This is a service much like sending images over MSN for example. For this you only need to make sure you and your friend are both using the same messenger service and both online at the same time. Whilst some people may like this method (and some genuinely do use it an awful lot of the time) I've not been sold over to it personally due to fact that I've simply found Emailing to be quicker, though this is likely to change over the coming years as these services continue to improve.

Facebook has been an internet super-power for the past few years and now you can use the massive social networking sites to send pictures directly from your phone to someone on your friends list. To do this you need to use the Facebook "Messenger" app and select it as a "Share via" option (with an Android, I'm not exactly sure with other phones) when you've selected a picture, then slect a friend. This is a bit of a middle line between e-mail and the above messaging apps as this can be recieved on a PC or a Phone (or anywhere else where the recipient can access their Facebook).

You could as a fifth option (and by far the least attractive for some pictures) share them publicly via Social Networking sites like Twitter, Picasa or Google+. If the picture is something you do want to share with a wider viewing public this is a much better option than E-mailing it to a number of people. However on the flip, if the picture is something that you would only like one particular person to see you'd be rather silly to use this option.

As said at the start of this post, modern phones do have a host of other options to share pictures, though I'd say these are the main 5 to look at if you wish to share the picture with someone further a field than the Bluetooth range on your handset. Of course if you are close enough to use Bluetooth I'd reccomend using that instead as it's quicker and much easier than using things like Ebuddy XMS or Facebook.

Where did I get all these extra pictures from?

If you are using a Samsung Galaxy S2 (and I presume any phone running Android 3.5) you may have recently noticed your Gallery has a number of new albums and a host of new pictures, as if they've appeared randomly. What you may have noticed about each of those new albums is they have a small white logo on them that looks oddly enough like the Picasa logo (feel free to visit http://picasa.google.com/ if you wish to check the logo). Now, although I'm not 100% certain, it does appear that the update to 3.5 now allows you to access your Picasa/Blogger/Google+ images directly from your phones "Gallery".

Although I've not done a huge amount of testing with this and it may require specific settings to do, it could well explain why so many people have suddenly seen the amount of images on their phone jump from a few hundred to thousands almost over night.

This shouldn't be a major issue for many people though it is worth noting that all your blogs pictures are now on your phone (which means I have over 600 from this blog!)