Friday, July 29, 2011

How to add a picture from the Samsung Galaxy S2 Gallery to Facebook

 So we've managed to take a bunch of photographs with the excellent 8MP camera on the brilliant Samsung Galaxy S2 smartphone and now we want to add one of the pictures to Facebook. Firstly we need to find the picture in the Gallery, so open up the Gallery App and find your photograph then press the phone's "Menu" button. After doing this your display should look something like the image to the right with options along the bottom saying "Share via", "Delete" and "More".
When you see the options mentioned above you need to click on the "Share via" option and you'll soon be greeted with a nice long list of possible choices with all the apps you can share things via. At this screen you need to select on on "Facebook"
after which you will quickly be taken to the facebook app and
asked to give a name to your picture (as in the picture below right).

After giving your picture an adequate title/name you need to click on "Upload" and the photo will be added to one of your facebook albums. Please note before doing this however that
you will need some form of active internet connection (be it
mobile internet or WI-FI) and if you're using mobile internet it will be taken from your allowance.

It is worth noting before you begin that photographs can take a while to upload. If you pull down the notification bar from the top of the phone you can "watch" it uploading to your facebook account. When it reaches 100% your photo will be in your facebook album (usually the "Mobile" folder or something to that effect).

Thursday, July 28, 2011

How to access the secret test menu on a Samsung Galaxy S2

One of the very strangest hidden secrets in today's phones are the "secret codes". Whilst I'm not going to give you a list of all the secret codes that have an effect on the Samsung Galaxy S2 I will give you a heads up about one of the safest codes, the "Test Code". To start this you need to go into the "Phone" application and simply type:
*#0*#

As soon as you type this code your screen will change and will look like the image to the right. This screen allows you to test a number of simple things and I've just picked a handful to look at.
This screen is the dimming test, it's meant to show red, green and blue stripes going from light to dark, basically dimming the colour from the respective section. Whilst not too amazing it's a very simple to understand test that everyone can see.

Sadly they aren't all that simple and if you click on the sensor option you are met by this beastly looking screen (picture on the right) full of long words and long numbers. I'm not going to pretend to understand much that's going on here but a few things are very interesting. Firstly the phone measures it's relative flatness, (the job of the accelerometer) secondly if you put your finger over the proximity sensor (near the front camera) the screen will turn green and vibrate.

Though the oddest thing about the Sensor test function is the "IMAGE TEST". I wish I was making this up but clicking on the image test on my phone brought up the picture of a chihuahua, or to us less animal loving people, a dog, that can be seen in the screen shot to the left. Quite why we'd find a dog like this in the Sensor test has baffled me but it may well be the weirdest secret you will find on a Samsung Galaxy S2.

When you are done testing things, or feel "stuck" as you can do with the "Touch" test, press home to return to the home screen. There doesn't seem to be any possibility of damaging your phone by playing with these small in built tests, though the dog picture may unnerve you for a little while.

The quick way to turn off the data connection on a Samsung Galaxy S2

In a previous guide I showed you how to turn off the "packet data" internet connect on a  Samsung Galaxy S2 by going through the menu screens. You may be happy to know that it's actually a lot, lot easier than doing that and can be done almost in an instant.

If you hold the "Lock" button for a few seconds you will see a "Phone options" screen pop up like the one on the right hand side. As you can see the second option is "Data network mode" if you decide to "Disable" it, by simply pressing it, then you've turned off the mobile internet from the phone. Again to enable it you can just hold the "Lock" button and re-activate the Data network mode option.

How to add a security pattern to the lock screen of a Samsung GalaxyS2

Considering the fact that we all love a bit of privacy on our phone you may love to hear that setting up a simple security lock on the Samsung Galaxy S2 is incredibly simple and in fact the phone has several different types of locking system.

This guide is going to show you how to put on a simple "Pattern" lock using the phones in built security settings. To start this we need to open the "Settings" screen so press the phones "menu" button and then "Settings". At the settings screen scroll down to the "Location and security" option (see the picture to the right for guidance if you need it).
Whilst in the Location and Security menu you need to select "Set up screen lock" and after this you will find yourself with a new menu opening up. This new menu will feature 4 settings
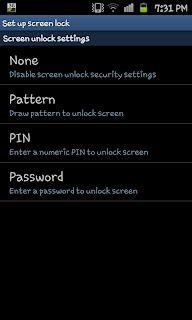
"None", "Pattern", "Pin" and "Password". For the purpose of this guide we will be using the "Pattern" option.

After clicking on "Pattern" you will see 2 screens guiding you on what you need to do and explaining how the system works. If you click "Next" on both of those screens you will be asked to "Draw an unlock pattern" on the screen over a 9 dot display (see left).

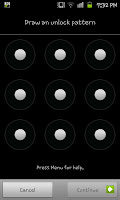
At this point the pattern must be at least 4 dots long so draw your pattern linking 4 (or more) dots together in what ever pattern you like. After you've done this you will need to click on "Continue" and repeat the pattern to help make sure you remember it. If you are the forgetful type I would advise you write down you pattern in someway, perhaps number the dots 1-9 and writing the way you've linked them. I.e. 1-2-3-6 (top left, top centre, top right, middle right). After confirming the pattern (bottom right after re-entering the pattern) it will be put in place.

 The next time you lock your phone you will see the 9 dot display sitting over the top of your regular lock screen wallpaper (see the image on the right). You will now need to enter your pattern before you are able to access the phone.

This is a brilliant and simple way to deter family and friends from trying to access you're phone, if you've some of those embarrassing pictures on there this maybe the perfect protection for you just make sure you remember it.

How to set a lock screen wallpaper on your Samsung Galaxy S2

Everyone loves to customise the way their phone looks, and acts when it's in full working operation but you can also customise how it looks when it's it's locked with a lock screen wallpaper. This guide will show you exactly how to use a lock screen wallpaper.

To start with you will need to open the Settings screen (press the phone's menu button and then settings). From the setting you will need to open the Display options (the 4th
option from the top). In the Display menu you will see the "Screen display" option at the top (refer to the picture on the left) click this one.

If you've been following these guides for a while you'll notice that the Screen display options was earlier used for the guide on changing fonts on a Samsung Galaxy S2, this time you need to click "Wallpaper" but the one that is found in the "Lock screen" section. If you're confused on which of the two to click on it's the one at the bottom of the menu.

After selecting "Wallpaper" you'll be asked to select where you want to choose a wallpaper from. This is either the inbuilt Wallpaper gallery or the normal Gallery (any pictures you've taken or downloaded). You'll then have to select the size of the picture in question which is simple to do.

After you've selected your picture and size click save, after this
you will just need to lock the screen and check that it's working. If it is working it should look something like the image to the right with the time and date showing on the screen but no shortcuts or apps there to click on.

As with many of the personalisation settings this doesn't really effect the phone a great deal, it may run the battery down slightly quickly and add a moment of lag to the phone though on the whole these will be hard to actually notice.

Monday, July 25, 2011

How to change the search engine on the Android internet browser

 Whilst google is by far the market leader in the search engine world it's not everyone's preferred search site. If you're one of those who prefers to use Ask Jeeves, Yahoo or Bing then thanks to the in built internet browser on Android phones your in luck. To start with you will need to enter the browsers "Settings" menu, to do this you press "Menu" on the phone and then select "More" to reveal a list of options like the list to the right. When you see the screen to the right click on "Settings".

At the "Settings" menu you will need to scroll right down to the bottom until you stumble up on the "Advanced settings" sub menu. The first "Advanced setting" you will see should say "Select search engine". Clicking on this option will see a new short menu pop up (see the screen shot to the right) allowing you to pick from the in-built search engines.


A question to my international readers here (and I know I do have some of you) can you please help me and tell me what option you get instead of "Yahoo! UK & Ireland"? Is it just Yahoo! Then the name of your country or is it something else?

How to change the home page on the default android internet browser

 Although I'm not a huge fan of the default android browser (preferring to use either Skyfire or Opera mini) I do use the default browser on a more than regular basis, mainly to keep a track of this blog whilst I'm out.

As a result of playing with the browser  I've decided to explore what you can do with it and one of the first things I did was change the homepage from the default Vodafone "myweb360" to the much more useful google.com. This guide shows how I did just that starting with the screen on the left (to get to this screen press menu and then press on more).

On the screen on the right you need to scroll down to Settings which will open a screen like the one on the left here. At this screen you will notice a lot of options, the one that you need to click on is rather unsurprisingly "Set home page". As you can see in this image the home page has been set to "http://myweb.360.com".

By clicking on the option you will get the chance to set a new home screen as you can see in the screen shot to the right here. You can type in any page that you want to open when you open the browser or a new window. If you're already on the page you can easily click "Use current page" instead of typing in the web address.
After opening a new window you will see the new home page in effect just as you can see here. This is very simple to do and although it's not enough to make me an out and out use of the default browser it is a very useful feature that you may wish to make the most of if you are stuck into using the default browser.

How to add pictures to contacts on your Samsung Galaxy S2

If you've added a contact to your Samsung Galaxy S2 manually you'll have noticed that the contacts image is just a silhouette. As we can see in the image to the right Scott lacks a picture (not complaining, he does look a lot like a hobo) but he's asked me to add one to his contact. Doing this is simple but a little bit long winded.

Firstly we need to find the contacts profile, the screen that looks like the image to the right. On this screen we need to press the phones menu button to open up a small pop
up menu on the phone (see the image on the left). On this menu you need to select the "Edit" option in the top left hand corner.

If you look to the right here you'll see the edit contact screen,
and where the contacts picture should be you can see a small (+) symbol. By clicking on this part of the screen you will open up a small pop up allowing you to select either "Album" or "Take photo".

After you select to either take the picture or use one from your album you'll need to find the picture then resize it. When you're happy with the image click on "Save" on the image screen and then click on on the "Edit contacts" screen to save the profile with the picture.

Whenever the contact now calls or texts you it will act just as contacts from Facebook doing it where you see there image on the call screen and text conversation list.

Whilst this is easy enough to do you will need to remember that you will need a picture of the contact (or a picture that you want to use for the contact) and that doing them in bulk (for lots of contacts) can be relatively time consuming.

How to search your Samsung Galaxy S2 for other things like music

 By now we know how to access the search feature on the Samsung Galaxy S2 by holding the menu button and we also know how to do voice searches on the phone but did you know the phone can search for things that aren't just via google, things such as messages, music or contacts?

Firstly we start at the search screen which you can see to the right here, on this screen
you need to click on the small google logo and you'll see a small menu allowing you to search through different things (see the screenshot to the left). As you can see in the screen shot there is a little grey icon above the empty space (directly below the voice search icon), pressing this opens a world of options (see the screen shot to the right) listed as "Searchable items".

 From the list of searchable items you need to click in the check boxes for the ones you want to add to google, web and apps (or which ever other defaults ones you may have). This for example allows you to add things like music to your search areas.


Now when you press on the google icon you will be able to select these different searchable items, which makes finding things like the track you want to hear or the message you want to find an absolute breeze compared to scrolling through them to find it.

As we can see in the screen shot to the right however, having a popular term searched for on the phone may actually not make life easy. Instead of searching for "Buckley" maybe I should of searched for "Jeff Buckley Grace". But you see the idea well in this image of just how effective and easy this is.

How to hide your number when calling from a Samsung Galaxy S2

You may be one of those secretive type of people who wants to hide your number when you make out going calls. Whether you're calling up someone who you don't want to have your number (an ex for example, or someone you're prank calling) or whether you think calling with a withheld number will result in the person picking up your call we all have our reasons.

To with-hold your number on a Samsung Galaxy S2 is incredibly simply and here's exactly how you do it. Firstly press the phones "Menu" button then click on "Settings" where you will see a screen like the one to the right. Whilst here you need to select
"Call" which will open a screen like the one to the left.

On the Call Settings screen (the one to the left) you need to select the option entitled "Additional settings" which will be the final option before you enter the "Video Call Settings". This will open a new menu for you and the top option of this menu will be the
"Caller ID" option. This is the option you need to select.

 When you've clicked on Caller ID you will see a new sub menu pop up with 3 options (see bottom left). At this point you need to select the "Hide number" option.

With the option set to "Hide number" recipients of calls should get the call from a caller that shows as "Unknown" on phones that show the caller.

Although there are other ways, such as entering 141 in the UK before a persons phone number the "Hide number" setting is worldwide and will allow you to mask your number when and if you which to withhold your number.

How to set call reject messages on a Samsung Galaxy S2

We can't always answer the phone, for whatever reason we find ourselves unable to talk but we don't want to be rude and just outright reject the calls. What we can do with a Samsung Galaxy S2 is set up a reject message. To set out own messages we press menu then open the settings screen and find the "Call" setting (second option down in the screen shot to the right).

In the Call settings menu you need to select the "Set reject messages" option. In here you will see a list of default messages that can be used (or edited for personal preferences) or added to.

In the reject messages screen you can select any of the 5 default
messages or create one from scratch to use when someone calls you. If you create one you can make a more personalised one for example "I'll call you back, just seeing someone in hospital".

To use these these messages we need to drag the "Reject call
with message option from the incoming call screen to the right. This is the screen where you choose to accept or reject calls though by selecting the bottom option you will see a list of your messages (similar to the list in the screen shot to the right) allowing you to select and then send the message.

How to accept or reject calls with a Samsung Galaxy S2

When you receive a call on the Samsung Galaxy S2 you will see a screen very similar to the one on the right. The next step is really easy and simple though some people do seem to be struggling with it (hence the reason for this guide).

What some people have been doing is merely pressing the coloured icons expecting that that will either accept the call or reject it. Instead what you need to do is "pull" or "drag" the icon across the screen. If you want to accept the call drag the green icon from the left of the screen across to the other side whilst if you wish to reject the call you drag the red icon across from the right side of the screen. Alternatively to reject the call you can leave it to ring out or even reject call with the message option.

To use the reject call with message function you need to drag the option up and then select the message you wish to send. Our next will look at setting up those messages to be personalised.

A secret trick for the Swype keyboard

 We've all made a mistake when using the swype keyboard and managed to spell the wrong word. On some phones using a trackball to navigate to the mistake and correcting it is simple, on other phones however you need to accurate press on the screen and move to the error, this can be rather fiddly.

A hidden feature on swype makes the accurate movement of the cursor much easier than using the trial error of pressing on the screen. In the image to the right hand side is an error (the "us" should read "is") so we have to correct this. To start we run a finger over the swype key (bottom left key) and the 123 SYM key. Just pretend these are two letters.
After doing that you will see the keyboard dramatically to resemble the image on the left here with a host of new and useful tools to allow you to accurately and swiftly navigate to the error and delete it (see the screen shot below).
By using the arrows and the delete key to delete the error and leave the cursor where the error was. If you then press on the ABC key at the bottom you will be returned to the keyboard to enter the correct text.


In the screen shot below you can see the corrected text as it was supposed to look when it was originally written.

Thursday, July 21, 2011

How to turn on 5.1 sound on a Samsung Galaxy S2

 If you've been using you're Samsung Galaxy S2 as an MP3 player and using the default music application you may well have see the small "5.1 ch" option towards the top left of the screen. If you've been a little bit curios odds are you've decided, at some point, to click it and been met with the message you can see on the screen shot to the right:
"5.1 channel can only be activated when sounds effects are off"

If like me you like to tinker about you'll almost certainly have clicked on the menu button and clicked settings then made sure you put "Sound effects" on normal. Then you've gone back and clicked the 5.1 option....and seen the same message ago.
 If you now click on "Menu" and then "Settings" what you now need to do is also make sure "Equaliser" is ALSO set to Normal. Make sure your settings screen looks like the screenshot to the left in regards to the top 2 options (Note: Visualisation can be left unchecked). When you've set things like this press the "back" button on the phone.

If you now press on the 5.1 button you will see it lights up.and you'll have your headphones providing you with 5.1 dolby surround sound technology giving a very different feel to your music the really adds something.


Note: 5.1 is only available when using headphones as he phone speakers cannot provider the correct channel. Pressing the option with out headphones being connected will see a message appear on the screen telling you that headphones are needed for 5.1 playback.