If you're in the UK, like we are, you'll have heard all about how 4G is going to revolutionise mobile internet and spread across the country like wildfire. We all know that 4G is going to be incredibly quick when you can get it, but before it comes to where we are we decided to find out what speed our mobile internet could get up to.
If you're like us, and curios as to what speed you can browse the net on your phone we'd advise downloading the "Speedtest.net" app from Ookla.
The app, that looks something like the image on the left is incredibly simple and gives you 3 important measures of your internet's speed.
Firstly the app finds your "ping" speed. This number, displayed in the top left of the screen, should ideally be a low number. Below 100 is good with a mobile. The best we've seen through mobile internet is a 54 so anything better than 50 should be viewed as amazing.
The app then finds your download speed. This is how quickly data goes from the internet to your phone. This speed determines thinks like how quickly a movie downloads to your phone, how smooth internet radio or streamed music is and how quick general browsing is. For this test the higher the number the better.
The final test the phone does is find your upload speed. This number relates to how long it takes to upload things, for example pictures to facebook and videos to youtube. As with the download speed, a bigger number is better though it'll be incredibly rare for this number to be anywhere near your download speed (in fact it'd be a shock to even be 1/2 of your download speed).
Unfortunately whilst the three tests are excellent, you speed can change at a moments notice, doing tests one after another can render very different figures due to changes outside of your control. Unfortunately this is just something you will need to put up with.
Note-If you're ping is over 1000 and your download speed is 0 it's often best resetting your phone's internet and doing another test as it's likely your phone isn't actually getting a "true" connection at that point.
phone tips
Sunday, September 15, 2013
Wednesday, July 3, 2013
How to use the "Dual camera" feature on a Samsung Galaxy S4
One of the big selling points (or gimmicks, depending on how you see things) with the Samsung Galaxy S4 was the ability to take a picture with both the front camera and the main camera at the same time.
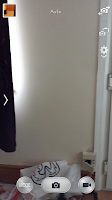 The idea was that the photographer could be included in photographs and videos or could be at a party on Skype and be included in a video conversation along with others in the room.Sadly beause we're pretty much doing this guide on the fly we're unable to truly show off how useful the feature is, but we can show you how to do.
Firstly you will need top open the camera app. From the Camera app you will notice 3 symbols on the top right hand side of the screen. The top of those 3 options allows you to switch from the front camera to main camera (and vice versa). The bottom of the 3 options opens up the camera menu. So instead of clicking on either of those two you need to select the middle option.
 When you've pressed that icon you will notice a stamp like shape taken up by whatever is in the view of the other camera (as you can see in the image on the left, it's my hand!)
Of course this feature was made with certain purposes in mind though I could imagine a number of other scenarios including for example, taking a photograph of yourself somewhere rather unique (i.e. the top of a mountain) or with someone special (for example a celebrity) though it can, of course be used for various humorous pictures if you've the creativity to think of things.
 The idea was that the photographer could be included in photographs and videos or could be at a party on Skype and be included in a video conversation along with others in the room.Sadly beause we're pretty much doing this guide on the fly we're unable to truly show off how useful the feature is, but we can show you how to do.
Firstly you will need top open the camera app. From the Camera app you will notice 3 symbols on the top right hand side of the screen. The top of those 3 options allows you to switch from the front camera to main camera (and vice versa). The bottom of the 3 options opens up the camera menu. So instead of clicking on either of those two you need to select the middle option.
 When you've pressed that icon you will notice a stamp like shape taken up by whatever is in the view of the other camera (as you can see in the image on the left, it's my hand!)
Of course this feature was made with certain purposes in mind though I could imagine a number of other scenarios including for example, taking a photograph of yourself somewhere rather unique (i.e. the top of a mountain) or with someone special (for example a celebrity) though it can, of course be used for various humorous pictures if you've the creativity to think of things.
How to change the clock format on the Samsung Galaxy S4
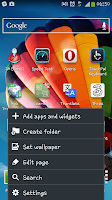 Most people seem to dislike using a 24 hour clock. It's always been a mystery to me as to why you'd dislike it but some folk just really don't get it. As a result of that we've decided to help show you folks how to change the clock format from the 24 hour format (popularly referred to as "Military time") to the more common 12 hour format.
Firstly you will need to go into the "Settings" menu which you do by pressing the phones menu button on any of the home screens and then clicking on "Settings" which is at the bottom of the pop up menu.
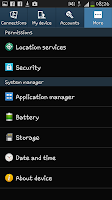
On the settings screen you need to select on the "More" tab which is on the extreme right of the "Menu" screen. This screen has a lot of options and settings that you can fiddle with though for the sake of changing the clock format you need to select the "Date and time" option which should be near the bottom of the screen.
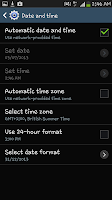 After selecting on the "Date and time" option you will see a new screen with a number of date based option. For the sake of the guide you need to unselect the "Use 24-hour format" if you wish to use a 12 hour clock format (with AM/PM showing at the top of the phone) or select the option to continue to use a 24 hour clock.
 The choice of format is of course yours to decide.
Wednesday, June 26, 2013
How to change the font size on a Samsung Galaxy S4
Although phone screens are slowly getting bigger as standard, they can still sometimes be hard to read. With the Samsung Galaxy S4 you easily change the font size to suit you and your needs. This guide will show you exactly how that is done.
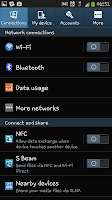 Firstly, as with almost every display guide you will need to access the settings screens. To do this you press "Menu" on a home screen and click settings from the pop up menu (see picture at the top of this guide for clarification, if needed).
From the Settings screen (see right) you will see 4 tabs at the top. By default the phone will have opened the "Connections" tab, so you will now need to click on the "My device" tab next to it, so you can find the "Display" sub menu.
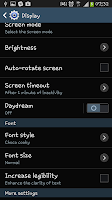 In the "My device" tab you will see "Display" near the top. From here you need to click on that and then scroll down the "Display" menu until you come to the "Font" section.
The "Font" section includes 3 options, a "Font style" a "Font size and an "Increase legibility" options. For the sake of this guide click on "Font size".
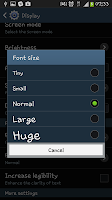
After clicking on "Font size" you will see a new menu open up with a choice of 5 options. By default the phone is set to "Normal" though you can select "Tiny", "Small", "Normal", "Large" and "Huge" depending on how you wish to personalise things.
One thing to note is that the "Huge" setting only applies to certain apps (with the rest resorting to the "Large" setting. This also doesn't cover EVERYTHING on the phone but does the menu's most apps and various other bits and bobs that you may feature writing.
Of course if at any point you want to change the size back you just need to go through the same steps and select the size you prefer.
 Firstly, as with almost every display guide you will need to access the settings screens. To do this you press "Menu" on a home screen and click settings from the pop up menu (see picture at the top of this guide for clarification, if needed).
From the Settings screen (see right) you will see 4 tabs at the top. By default the phone will have opened the "Connections" tab, so you will now need to click on the "My device" tab next to it, so you can find the "Display" sub menu.
 In the "My device" tab you will see "Display" near the top. From here you need to click on that and then scroll down the "Display" menu until you come to the "Font" section.
The "Font" section includes 3 options, a "Font style" a "Font size and an "Increase legibility" options. For the sake of this guide click on "Font size".

After clicking on "Font size" you will see a new menu open up with a choice of 5 options. By default the phone is set to "Normal" though you can select "Tiny", "Small", "Normal", "Large" and "Huge" depending on how you wish to personalise things.
One thing to note is that the "Huge" setting only applies to certain apps (with the rest resorting to the "Large" setting. This also doesn't cover EVERYTHING on the phone but does the menu's most apps and various other bits and bobs that you may feature writing.
Of course if at any point you want to change the size back you just need to go through the same steps and select the size you prefer.
Tuesday, June 25, 2013
How to tether (USB) with a Samsung Galaxy S4
 I have recently moved house and as anyone who moves house will know the internet connection they have won't be instantly activated at their new home. Fortunately thanks the "The One Plan" from 3 I've not been without internet thanks to the ability to tether that the plan includes.
Tethering, for simplicity terms is where a laptop (or computer, or games console, etc) shares the internet signal that the phone is using. Effectively it uses the phone as a modem. You can tether either by bluetooth or by USB
This guide will show you how to tether with a Samsung Galaxy S4 via a USB cable (that now comes as standard as part of the phones charger). Though before we go any further there are a few things to be aware of.
Firstly your phone will need to be picking up a mobile internet signal, secondly you will need to have your phone connected to whichever device you want to use (via USB) and thirdly you can incur data charges (and a lot of them for tethering) so make sure your plan allows tethering!
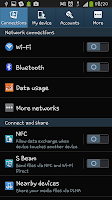 To start you will need to open up the phone's "Settings" menu. If you don't know how yo do this, you will need to go to a home scree and press the phone's "Menu" button, then select "Settings".
The first screen you will see in the settings screen is the "Connections" screen which will look like the screenshot on the right hand side. The first option you need to select from this menu is "More networks".
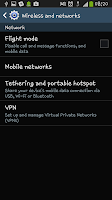 The screen you will then be taken to should look like the one on the left with 4 options. The one you need to select at this point is the 3rd one down, the one called "Tethering and portable hotspot".
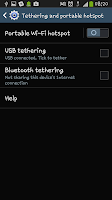 After selecting the "Tethering and portable hotspot" option will see a new menu with 4 options (including "Help") from this set of options click on "USB tethering" and make sure a little tick goes in to the box.
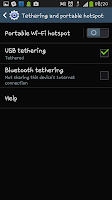 After you've ticked the "USB tethering" option you should notice that not only has the box got a tick in but that a new icon has appeared at the top of your screen (a little blue one that you can see in the bottom screen on the left). This means the phone is sharing a connection with your device.
Now the next step depends on what you are connecting it to. For a laptop or computer your device should treat the connection as a simple wired connection, as if you were using a USB modem (because that's effectively what you are doing) for other devices, i.e and Xbox or a Wii things may be a little more complicated (unfortunately we've not tested those).
When you are done tethering you merely need to unplug the cable from your phone or untick the "USB tethering" check box.
Once again, before you use this guide, be aware, tethering can run up major data charges. Please make sure you are on a plan that allows tethering and make sure you stay inside your limits.
How to show the battery % on a Samsung Galaxy S4
One of the problems with most mobile phones now a days is that the battery gauge is too hard to really understand. In the past the battery graphic used to be broken up in to sections representing a %. For example a battery might show 5 sections with each one representing 20% of a fully charged battery. Now however we just have a green bar with no real indicator of what we have left.
 Sure you can go through the menu's to check whenever you want, but wouldn't life just be easier if the phone told you what was left in the battery?
This guide will show you how to make the battery (as a %) show up in the notification bar allowing you to keep tabs on your battery level at all times, with out the need to navigate various menu's.
To start you will need to enter the settings screen. So go to a homepage and press the phone's "Menu" button, then select "Settings".
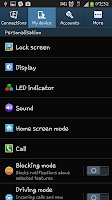 After opening the settings screen you will need to select the "My device" tab from along the top of the screen. Clicking "My device" should take you to a screen like the one in the screen shot to the left.
After clicking on "My Device" you need to select the "Display" option from the
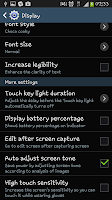 list. It should be the second on down(as you can see in the screen shot).
When you click display you should be taken to a whole new list of options. From here you need to scroll down until you see a header for "More settings".
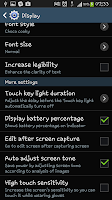 In the "More settings" section of the display menu you should be able to find a check box for "Display battery percentage". If you tick this box you will then notice that there is now a small "%" icon and number next to the battery icon allowing you to know exactly how much battery you have left at any time.
Of course, as with most things "Android" you can turn this on and off at will meaning that you can have it on one day and off the next with out any sort of issue at all. You just need to uncheck the box to tun it off,,
 Sure you can go through the menu's to check whenever you want, but wouldn't life just be easier if the phone told you what was left in the battery?
This guide will show you how to make the battery (as a %) show up in the notification bar allowing you to keep tabs on your battery level at all times, with out the need to navigate various menu's.
To start you will need to enter the settings screen. So go to a homepage and press the phone's "Menu" button, then select "Settings".
 After opening the settings screen you will need to select the "My device" tab from along the top of the screen. Clicking "My device" should take you to a screen like the one in the screen shot to the left.
After clicking on "My Device" you need to select the "Display" option from the
 list. It should be the second on down(as you can see in the screen shot).
When you click display you should be taken to a whole new list of options. From here you need to scroll down until you see a header for "More settings".
 In the "More settings" section of the display menu you should be able to find a check box for "Display battery percentage". If you tick this box you will then notice that there is now a small "%" icon and number next to the battery icon allowing you to know exactly how much battery you have left at any time.
Of course, as with most things "Android" you can turn this on and off at will meaning that you can have it on one day and off the next with out any sort of issue at all. You just need to uncheck the box to tun it off,,
How to change the font style on a Samsung Galaxy S4
One thing most people want to do when they get a new phone is personalise it, make it theirs. For many it's just about the wallpaper, the background screen and how they have their apps displayed on their homescreens, for others however they want to change more than just the lay out of things but also how things actually look.
On of the ways they can change the way things look is by changing the font that they use. This guide is going to show you just how to do that and change the font on a brand new Samsung Galaxy S4.
 To start with we go through the same stages as we do for many changes we may wish to make to out phone. So to start with we go to the homescreen and press "menu" to open up a little pop up menu. From this menu you need to select "Settings".
After clicking settings you will be taken to the first "Settings" screen, the "Connections" screen. From here you need to select the second tab along and access the "My device" tab from the top of the screen.
 When you get to the "My device" screen you will again be hit with a plethora of options to tinker with (further allowing you to personalise you phone). For now you need to just ignore those options and just click on the "Display" option.
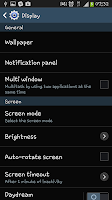
After clicking on the "Display" option you will be taken to a new sub menu which again has a host of things you can change and edit to your personal preference. For now, you need to just ignore them and scroll down the screen

When scrolled part of the way down you will see a a set of options entitled "Font". From the "Font" sub-menu you will see two options. "Font style" and "Font size" for the sake of this guide you need to click on "Font style".
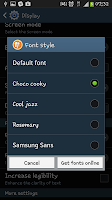 After clicking on "Font style" you will get a new pop up menu on the screen with a list of options. From those options you need to select the one you most like. For me it's "Choco Cooky" every time, though if you want to use one of the other options then that choice is yours.
On of the ways they can change the way things look is by changing the font that they use. This guide is going to show you just how to do that and change the font on a brand new Samsung Galaxy S4.
 To start with we go through the same stages as we do for many changes we may wish to make to out phone. So to start with we go to the homescreen and press "menu" to open up a little pop up menu. From this menu you need to select "Settings".
After clicking settings you will be taken to the first "Settings" screen, the "Connections" screen. From here you need to select the second tab along and access the "My device" tab from the top of the screen.
 When you get to the "My device" screen you will again be hit with a plethora of options to tinker with (further allowing you to personalise you phone). For now you need to just ignore those options and just click on the "Display" option.
After clicking on the "Display" option you will be taken to a new sub menu which again has a host of things you can change and edit to your personal preference. For now, you need to just ignore them and scroll down the screen

When scrolled part of the way down you will see a a set of options entitled "Font". From the "Font" sub-menu you will see two options. "Font style" and "Font size" for the sake of this guide you need to click on "Font style".
 After clicking on "Font style" you will get a new pop up menu on the screen with a list of options. From those options you need to select the one you most like. For me it's "Choco Cooky" every time, though if you want to use one of the other options then that choice is yours.
Subscribe to:
Comments (Atom)


