Wednesday, September 28, 2011

How to save pictures from the internet on a Samsung Galaxy S2

We've all seen pictures online that we like and we want to keep. Using a Samsung Galaxy S2 this is incredibly simple and this guide will show you how to take the images you see on the web and download them directly to your phone. Firstly you'll obviously need to find a picture you want to use and go to the webpage with that image, for the sake of this example we're using this websites own article on taking screen captures with a Galaxy S2 (see the screen shot to the right).

When you find the image you need to hold your finger on it for a second or two before being given a contextual menu like the image on the left of the screen. You will need to scroll down this list to "Save image" and then select it.

To find the image on your phone you will need to open up your "Gallery" app and you should find the image in a folder called "download".

Thursday, September 15, 2011

How to turn Haptic feedback off on a Samsung Galaxy S2

 When using a Samsung Galaxy S2 you may notice that that screen vibrates when you touch it, a small vibration as if to acknowledge that you've been touching it. This function is called a "haptic feedback", and laymans terms is basically "feedback to being touched".

Whilst it has it's uses some people don't like it and want to know how to turn it off, this
guide is to show you how to disable it in only a few quick steps. Firstly you need to access the the settings menu (like in the screen shot on the left) and then access the "Sound" options. In side the sound options you will see a screen like the one on the right hand side.

At the bottom of the screen (you may need to scroll to it) you will see the option called "Haptic feedback". You will need to uncheck this box and then you will notice that the vibrations stop.

You can of course feel free to turn this back on if you ever want to use it in the future.


Wednesday, September 14, 2011

How to factory reset a Samsung Galaxy S2

 With modern phones we seem to end up passing them on to friends and family though before we pass them on we need to give them a factory restore to delete all our information from the phone. This guide will show you how to factory reset a Samsung Galaxy S2.

Firstly you need to open up the phones settings menu and scroll down to "Privacy". The privacy screen should look like the screenshot to the left with 3 options but the key one is the bottom option, "Factory data reset". Click on the "Factory data reset" option and you will see a new screen.

The new screen will look something like this one the one on the right of this article. It will explain what a factory reset actually does so make sure to know what a factory reset is. Also make sure you actually do want to factory reset your phone before going any further.

When you've read everything and are sure you still sure you want to reset the phone click on "Reset phone" at the bottom of the screen and then "Erase everything" on the screen that follows.

After this the phone will go into an "auto-pilot" and stop you from doing anything as it resets the phone to it's "new" factory state. This will delete everything stored on the "internal" storage (so contacts, apps and system settings) as well as erasing all accounts associated with the phone (so the handset will no longer be getting E-mails, twitter alerts etc).

Whilst this guide is specifically for the Samsung Galaxy S2 which are where the screenshots are from most Androids can be factory reset in a very similar way and hopefully it answers the question of "How do I factory reset my phone?"

How to safely disconnect the Samsung Galaxy S2 a USB connection

When you've connected your Samsung Galaxy S2 to a PC or laptop by USB and done all the stuff with either KIES or dragged and dropped all the stuff you need to do you'll want to safely remove your phone from your computer. Usually to do this sort of thing you need to click something on your laptop however with the Galaxy S2 things are easier.

Instead of "safely" disconnecting you need to look at your phone and you will see a screen like the one on the left. If you click "Home" on the phone at this screen it will disconnect you from the PC connection. If you wish to leave the phone to charge you can leave the phone physically connected but outside of the "USB connection mode".


Saturday, September 10, 2011

How to hide files on a Samsung Galaxy S2

 Recently on a forum I saw someone asking for a way to hide files, most notably pictures and videos. Although I'm being a bit presumptuous I'm guessing this is someones secret "Naughty" stash. As a result of being asked it was only fair to find out...could we really hide files in Samsung's flagship phone?

The Answer was yes!

Firstly you need to open up "My files" (which you can find in the app drawer) and then press the phones menu button which should give you a screen like the one on the left. When you get this menu select on
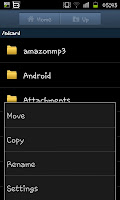
"More" from the bottom corner. After this you will see a new menu with 4 options (like the screen on the right) from this menu you need to select "Settings".

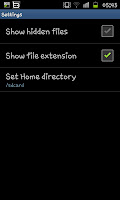
The "Settings" menu shows only 3 options, "Show hidden files", "Show files extension" and "Set home directory". You should see that "Show hidden files" is unticked, you need to tick this box then press the phones "Back" button.

After pressing "Back" you will be taken back to the "My files" screen except you will notice a number of folders that weren't there earlier. These new folders at the top will all have a "." in front of them.

Now you actually have 2 options. You can use one of the existing "." folders or create your own "." folder (for example ".nakedgirls") and then move what ever you want to hide into that folder. So for moving the files you will need to find them on your phone (likely in Download or Dcim) and then move them as you would any other file (full guide on moving files can be read here).

Hidden files can only be accessed through going into "My Files" and opening the folder, and the files do take a few moments extra to actually load, though they won't show on gallery. The perfect way to hide the stuff you don't want other people to find.

Note this allows you to hide not only pictures on your Samsung Galaxy S2 but videos as well, in fact it allows you to hide any type of file on your phone, though for many people these will be known as "porn folders" they do have some legitimate uses.

Friday, September 9, 2011

How to make another Folder in your Gallery on a Samsung Galaxy S2

 One of the great things about modern phones is that you can store 1000's of pictures on them though with 1000's of photo's it can take you a while to actually find where the one you want is. This guide shows you how to create another folder in your gallery AND how to move pictures to it, this effectively allows you to have "Album" folders on your Samsung Galaxy S2.

To start with you are going to have to create a new folder. To do this go into your "My Files" section of the phone (this can be found in your apps drawer) and then press "menu" and click on "Create folder" when you see a screen like the one in the screen shot to the left.

The next stage is giving a name to your folder or album, for example "Pictures from the Prom" or "Holiday Snaps". After creating a folder and clicking on "OK" you will want to put pictures into the folder. To do this go to where the pictures are currently stored
usually you will need to open up the "DCIM" folder and then the "Camera" sub folder (though if the pictures you want to use are else you'll need to find them).

When you are in the folder with the pictures press menu button and then click on "More" and then choose "Move" from the following menu (which should look like the image on the left). After all of the images will have a tick box next to them so select all the images you want to put in the new folder and press "Move".

 After selecting "Move" that final time you should be able to select a folder for your pictures. Now you will need to find the folder you created (so the "Holiday snaps" or whatever) and then select the folder then click where the phone says "Move here". The pictures should then be moved and if you go into the "Gallery" you should be able to find the new folder with the images you moved.

If you are using this to create albums then you may want to create quite a lot of them and keep them up to date regularly. You can do this via either the phone's in built file manage or using a PC to drag and drop the pictures sadly however it seems impossible to save them directly from the camera to the folder.

How to add words to the HTC Wildfire dictionary

To continue our "Dictionary" series we'll now show you how to add words to the HTC Wildfire dictionary. To
start with you will need to enter the "Settings" screen on the phone and then scroll down to "Language and Keyboard". Inside the "Language and Keyboard" menu is 2 options "Select Language" and "Touch input". If you select "Touch input" you'll be given a menu like the one in the photograph to the left.

From this menu you need to select "User Dictionary" which is the bottom option. In the next screen you will see "Add new" at the top of the screen, press on this then enter the word you want to add to the dictionary

Thursday, September 8, 2011

How to delete words from the Samsung Galaxy S2 dictionary

Recently we showed you how to add words to the Samsung Galaxy S2 dictionary however we've all managed to accidentally add words we don't mean to add. We are now going to show you how to delete words that we've typed in wrong or just added by accident.

The early stages are the same as adding a new word. We have to go into the settings screen and select "Language and keyboard" and then select "XT9 advanced settings". After selecting "XT9 advanced settings" you need to select "XT9 my words" which is quite far down the list.

In the "XT9 my words" screen you need to press the phone's menu button and then select "Delete" from the bottom of the screen. This will see the list reloading with each of the words given a tick box. You can select all the words you want to delete at once and then press "Delete" on the bottom left of the screen.

After pressing delete this time you will be asked to confirm if you want to delete the words (allowing you back out) if you press "OK" the words will then be deleted.

Of course if you delete the wrong words you can easily re-add them to the dictionary with out any problems.

How to add words to the Samsung Galaxy S2 dictionary

 We've recently looked at adding words to the Swype dictionary though lets be honest not everyone is a fan of Swype and some people do like to use the default Samsung keypad on a Samsung Galaxy S2, fear not you too can add words to your dictionary.

Firstly you will need to open the setting screens and then find the "Language and keyboard" settings which will look something like the screenshot to the left. In here you will need to select "Samsung Keypad".


After clicking on the "Samsung Keypad" option you will see a screen like the one on the right hand side. You may need to scroll down to find it though the option you need to select is "XT9 advanced settings" which you can see in the image on the right.


In the "XT9 advanced settings" screen you need to scroll down to "XT9 my words" which is quite close to the bottom of this screen. This is where all the words you've added to the dictionary can be found...including those you've added by accident when you've mistyped something.


Whilst in the "XT9 my words" screen (see the image to right) you will find a host of words you've added. On this screen you need to press the phone's "Menu" button and you will be see an option on the bottom of the screen saying "Add". Click on the "Add" option and then type the word into the following screen and select "Done". After clicking on "Done" the word will be registered on your XT9 dictionary.

Whilst this seems an awful lot of effort you can add a lot of words at once when you get to the "My words" part of it so add a bunch of words and you'll be fine.

How to delete words from the Swype dictionary

We recently looked at how to add words to the Swype dictionary, it's only logical now to explain how to delete words from the Swype dictionary. I'm sure we've all managed to accidentally add words that we don't really want in the dictionary (such as "xxc" that I had typed when trying to type "xxx").

To delete the word you will need to type it by Swyping it, then highlight it (hold on it and then choose "Select word") and press on the "Swype button" (the button in the bottom left corner with a blue S and a finger). Pressing the "Swype" button will see a pop up on the screen asking if you want to "Confirm Word Deletion". If you are sure you want to delete the word press on "OK" and it'll be gone.

Of course you are able to re-add words if you delete a word that you do use, to do this you just need to follow the "add words to the Swype dictionary" guide linked to at the start of this guide.

How to add words to the Swype dictionary

We all have place names or real names that aren't included in the Swype dictionary. For example I used to live in a little known village called "Silecroft" and that's never going to be a in a dictionary, lets be honest. What we can do however is add words to dictionaries and with the Swype dictionary that is incredibly.

To add words to the Swype dictionary you first need to enter the word letter by letter. For example for "Silecroft" we would enter "S-I-L-E-C-R-O-F-T" pressing one after the other (note you do need to press them, do not Swype parts of the word). After typing the full word just press space and the word will be added to the Swype dictionary.

Hopefully this guide helps you get the most from Swype.

How to use the inbuilt Task Manager on a Samsung Galaxy S2

 We've all become well accustomed to task managers in general, especially Windows PC users who may use it to close programs that aren't running properly or have become resource hogs. Due to the fact phones are now mini computers they two have got task managers.

In the past Android users generally relied on 3rd party apps such as "Advanced Task Killer" to close apps that were using up the battery or not running properly. After all this is what PC users were doing at home, the problem was that the "Advanced Task Killer" wasn't actually as good as people thought it was.

With the move from Android Froyo to Android  Gingerbread Google started to include
there own, much better Task Manager. This allowed you to accurately and proper close apps that were draining your resource or had basically crashed. With the Samsung Galaxy S2 you just need to hold the home button for 2 or 3 seconds to get to the shortcut to the Task manager. If you see the image to the top left this screen appears when you hold the home button, if you click on "Task manager" you will get taken to the screen on the right.

From the screen on the right you can see the applications you have open and and the ability to close (or "Exit" them) as well as clearing the memory (click RAM) or checking free storage (click on Storage). This is much simpler and much more effective than "Task Killer" apps you'll find on the market and is really where you should head if you feel your app has frozen.

How do I add a Yahoo e-mail account to a Samsung Galaxy S2?

 In the past we looked at adding a hotmail account to your Samsung Galaxy S2, now we look at adding a yahoo account so that you can sync up your phone with any yahoo e-mails you may be getting.


For this guide we've gone through the settings menu as opposed to using the "E-mail widget". For this you will need to open up the settings and the scroll down to "Accounts and Sync" which will look like the screen on the right. At this screen you need to select "Add account" from the bottom of the screen.

After clicking on add account you will see a screen like the screen shot to the left. From here you need to select the "Yahoo! Mail" option which should be near the top of the options. After clicking on "Yahoo! Mail" you should see
a login screen like this one on the right.

At the login screen you need to enter your full yahoo e-mail address and your password. For your yahoo e-mail address you can also use a "rocketmail" e-mail address as well as yahoo.co.uk and yahoo.com. After entering your login details untick the "Set as premium account" box and select "Next" from the bottom of the screen (you will need to scroll down).

After pressing next the phone should connect with the server and soon afterwards you should be logged and synced up.

Note-As well as setting up a yahoo mail account this way you can also set up your hotmail or msn account in a similar fashion (clicking on hotmail instead of yahoo). If you feel this is an easier method than going through the "e-mail" widget (there really isn't much difference).

How to delete text threads from a Samsung Galaxy S2

Due to the way the Samsung Galaxy S2 (and Androids in general) store the texts in "Threads" (or "Threaded conversations" if you prefer) the texts are kept pretty tidy by default. One of the best things about threaded conversations though is how easy they are to delete from the phone. Whether you want to delete some texts from an ex, a friend or just delete something a company has sent you, this guide will show you exactly how you delete those threaded conversations from a Samsung Galaxy S2.

Firstly you will need to open your text app, which should look something like the image on the left. This will show a list of all the text conversations on your phone with the persons picture, their name, the latest message and the date all being shown. What you need to do at this point is hold your finger on the conversation that you want to delete. For this example we are using "Tara Lewis" so I held my finger anywhere in her "block" (from the picture to the date).

After holding your finger down you will notice an option (see the screen shot on the right) with "View contact" and "Delete thread", at this point you need to select "Delete thread". After this you will be given the screen you can see in the screenshot to the left with a choice to "Cancel" or "OK" the deletion.

Please note- Only use this method if you want to delete all the messages in a conversation as that is what this does, it completely deletes the conversation from your phone. If you want to delete specific messages they you will need to open the thread and delete the messages individually.

How to change the lock screen on a HTC Wildfire

As we all want out phones to be really "ours" we like to tinker with things like ringtones, fonts and wallpapers. With many phones however you can also change the lock screen wallpaper independent of the normal wallpaper, this guide explains how to set a lock screen wallpaper for the classic HTC Wildfire smartphone. This lock screen wallpaper will show up in the background behind the clock on the lock screen of your phone.

Firstly you need to press the phone's "menu" button and then select "Wallpaper" and then simply choose "Lock screen". After this you will be given 2 options "HTC Wallpapers" or "Gallery". If you want to just change the image to something generic feel free to have a look at the HTC Wallpapers, though I advise it's more fun to use a photograph of your own and searching your Gallery for a picture to enjoy.

Using a picture you've taken can add not only a nice personal effect by allowing you to display things such as a garden, your family, a sports team or yourself but also a smart little visual effect using pictures that were taken with added effect. In the wallpaper to the left the wall paper image was taken in sepia giving a rather antiqued look to the phone behind the clock and battery warning.

Whilst this is a little bit pointless it's a nice little thing you can change if you want to personalise your phone that little bit more with out downloading apps to really take a hold of your phone.

Wednesday, September 7, 2011

A solution to an MMS problem on the HTC Wildfire

I know the phone is old an old one but people are still using it and thanks to the HTC Wildfire S the name seems to have popped up once again. I've not a Wildfire S to test on but if you are trying to send MMS (media messages) on a HTC Wildfire and keep getting a "Generic network failure" the solution is usually really simple to solve.

Most of the time if you're getting this error you are connected to Wi-Fi with your phone and as a result the phone isn't able to send OR receive things over the data network. What you need to do is turn off the Wi-Fi connection and let the phone attempt to resend the picture. This should solve that problem as long as you can actually receive an internet connection via the data network.

Please note I've not tested this with a HTC Wildfire S so I'm not sure if it's been corrected on the new version of the phone.

How to take a screenshot with a HTC Sensation

The screenshot feature has been included in a number of Samsung devices and now you can join in if you have a HTC. Before you start you will need to make sure you are running Android version 2.3.4. To check your version you will need to go into the phones settings screen and then find the "About phone" option and scroll to "Android version". As long as it says 2.3.4 (or higher) you're ready to go.

Now on any screen you want to take a screen shot on press the power button and the home shot and the phone should take a screenshot of it's self with out any need to download an app or even rooting the device.

One of the key uses of this is for guides though another, growing use, is to use the images to post them on forums to show off problems. For example if you have a specific symbol showing and want to know what it is you can post a screenshot and make things easier for people trying to help you.

Tuesday, September 6, 2011

How to watch live TV on your Samsung Galaxy S2


If your in the UK did you know you can free AND legally watch Freeview TV on your Samsung Galaxy S2 (or other modern phone, though I'm not sure on which phones in particular).

Firstly you will need to go to www.tvcatchup.com and create a free account then visit the site on your phone and login on the phones browser. The sign up is completely free and really simple, so you really won't struggle with doing this.

When you've logged into the account on your phone you will be able to access a channel list like the one in the screen shot on the left hand side with (almost) all the freeview channels. Whether it's a BBC channel (1,2,3,4, News and Parliament) an ITV channel (1,2,3,4 and some of the +1 channels) or the other channels displayed in the screen shot to the left, all you need to do is select one of them.

After you've selected a channel you'll  see a new screen like this one on the right hand side with a white space and a small triangle in a square block. You need to click inside the space here to "load" the video which should play. You may however want to turn on "Auto rotate" and flip the screen on it's side to get a full wide screen type of view of the channel.


As you can see in this screen shot to the left the quality is brilliant on a good phone (this shot was taken on a Samsung Galaxy S2). The best thing is that the stream is only a few seconds behind "live" TV.

Before you start doing this to watch all your TV just be aware you will be using data so either make sure you're on unlimited data (such as that offered by T Mobile) or your connected to the internet by Wi-Fi as it is very data intensive.

Whilst this guide was done with a Samsung Galaxy S2 it's worth trying with any "new" phone (any phone running Android 2.1 or better should be fine).

Monday, September 5, 2011

How to add music to your videos on a Samsung Galaxy S2

 One of the questions we've seen asked on forums regarding the Samsung Galaxy S2 is "How do I add music to my videos?" This is a question that is actually remarkable simple and yet incredibly effective, especially if you want to make a home made "music video".

Firstly you obviously need to have your video, so make sure you film the video you want to use. After this you need to open up the "Video Maker"
app (you made need to look in the app drawer to find it). Then choose "New" on the first screen and select a theme (I advise using none) then find your video. Once you've found your video drag it to the bottom of the screen then click on the musical note. Now you can select a song from your phone, when you've found the one you want to use drag it to the box under your video and you'll have added music to your video.

Now to find the video with your music add you will need to press "menu" and then export the video which can take a little while, but afterwards the video should be found in your gallery in a folder called "Video Maker"

How to add new fonts to a Samsung Galaxy S2

In the past we've looked at changing the font on your Samsung Galaxy S2 but by default there is only 3 fonts, now we are going to show you how to add a whole lot more! Before you begin going into your settings screen and click on "Applications" and tick the box next to "Unknown sources".

After allowing "Unknown sources" with you will need to download "Font for Galaxy SP" from the market, this is a free app and can be used for any Samsung Galaxy phone so if you've stumbled here and are using a different Samsung Galaxy model you can follow the guide anyway!

When you open the app you will see something like this, click on the F in the middle to open a list of fonts that the app has. Whilst the list isn't exhaustive and it does miss a lot of well known fonts it does have a really decent amount. When you select one one you can see how it looks and decide before downloading it whether or not you like it.


When you find one you like and want simply click on it and the phone will automatically download it so pull down the notification bar (like in the picture to the left) and click on the newly downloaded font to install it.


After installing the font you need to follow the guide for changing font so go into your "Settings" and open up "Display" and then "Screen display" before opening the "Font style" option which should now list your new fonts (like the image to the right). So whether you want a bold font, a small font, an italic font or something else, you'll likely find one there somewhere.

Just note you will need to add every font individually (which is a bit time consuming if you want to add a lot of fonts) and the app doesn't have all the fonts you may be used to using (for example no "Arial" and no "Times New Roman") but there is a lot of choices open to you.

How to share android apps over your social networks

 So you've managed to find yourself a fantastic app and now you want to share it with your friends and family over facebook, twitter or Google+, this guide will show you exactly how to do this.

Firstly you need to open the app drawer, it will look something like the image to the left hand side with all your apps (though you may have a different view, such as a list view) on this screen you need to press on your phones "Menu" button and then choose "Share app".

After you click on "Share app" you should see a list of the apps on your phone with a tick box next to them and a search box (much like the screen shot on the right hand side). From this screen you need to select the app (or apps) you wish to share. For the sake of this example I'll be sharing the excellent game "The King Of OX", so tick the box next to the game (as I have done in this picture.
After selecting the app (or apps) you want to share click "Done" on the bottom of the screen and then you'll see a screen like the one on the left, the "Share via" screen. This screen will have all your social apps (facebook, plume, twitter etc) so select the one you want to share the app with. For the rest of this example I'll be using Facebook but the other apps are all similar

After clicking on the app you want to share with you will open that app (as you can see in this screen shot I'm sharing it over facebook) and you'll be able to add your own comment. When you are happy with the message and the app your sharing you need to just click "Share" and you'll be sorted.

After clicking "Share" (or send, post etc depending on the app) it will be added to your feed or status and your friends will be able to click on the status to be taken to the app market and download it themselves with out needing to search for it.

Sunday, September 4, 2011

Posting youtube videos to facebook on an Android phone

 So you've found an awesome youtube video whilst surfing the web on your Android Smartphone phone and now you want to share it with your friends, but you don't know how. This guide will explain, in details, exactly how you share any videos found on the youtube app with your friends on facebook, twitter, google+ or any other social networking app.

First you will need to load up a video in youtube and make sure the view is set to the portrait view. This should look something like the image to the left and at the top of the screen you can clearly see "More", click on this.

After clicking on "More" you will see 5 new options open up on the screen like in the screen shot to the right. From those options you will need to select on the "Share" icon (which you can see near the right hand side of the screen). If you've used the "share" facility on Android in the past you will know what to expect
and for those that haven't used the "share" facility before it is really simple. You'll see a list of your social apps (similar to the screen shot on the left) which you can scroll down to find the exact app you want to use, for example "Twitter" or "Plume".

When you've selected the app you want to share the video on
you will be taken to the post status screen (like this screen shot of posting on Facebook). When you've added your message to go with the video just post (or share) as you would do normally and it'll be updated to your status.