Showing posts with label Deleting. Show all posts

Tuesday, September 4, 2012

How to delete icons from a homescreen on a Samsung Galaxy S3

 I recently showed you how to personalise your phone by moving the icons around on the home screens of your your Android Smartphone, specifically the Samsung Galaxy S3. Now I'll show you how to delete icons from your home screens allowing you to tidy up mistakes (i.e. having the same icons on home screens twice), get rid of icons for apps that you no longer use or just create some extra space.

For this example I will be deleting the "ESPN Cricinfo" incon that sits in the middle of the 4th home screen. I accidentally placed it on the same screen as an existing icon for the same app.

Firstly you need to select the icon you wish to delete. To do this you need to hold your finger on the icon for a few seconds until the screen looks like the image on the right with the icon you selected looking a little bit "ghostly".  After selecting the icon you will notice that the "Apps" icon from the bottom right hand corner has now turned into a bin with the word "Delete" underneath it.
You need to drag the icon from where it is down to the bin. After doing this the icon will be gone from the home screen, however the app will not be uninstalled from the phone and you will be able to replace it on the home screen easily if you wish, or if you delete the wrong icon by mistake.

Thursday, September 8, 2011

How to delete words from the Swype dictionary

We recently looked at how to add words to the Swype dictionary, it's only logical now to explain how to delete words from the Swype dictionary. I'm sure we've all managed to accidentally add words that we don't really want in the dictionary (such as "xxc" that I had typed when trying to type "xxx").

To delete the word you will need to type it by Swyping it, then highlight it (hold on it and then choose "Select word") and press on the "Swype button" (the button in the bottom left corner with a blue S and a finger). Pressing the "Swype" button will see a pop up on the screen asking if you want to "Confirm Word Deletion". If you are sure you want to delete the word press on "OK" and it'll be gone.

Of course you are able to re-add words if you delete a word that you do use, to do this you just need to follow the "add words to the Swype dictionary" guide linked to at the start of this guide.

Wednesday, June 29, 2011

How to delete an alarm from a Samsung Galaxy S2

So last week you had to get up early and now your on holiday and you want to sleep through with out the alarm on your Samsung Galaxy S2 going off and waking you up, but you don't know how to delete the thing.

We start this process back at the "Alarm" screen (which you find when you click on the "Clock" application). Whilst here you need to find the actual alarm you want to delete. For this example we've only got a single alarm set so we don't need to scroll through alarms to find the "offending" one.

When you find the alarm you want you need to hold your finger on the alarm until you see the small drop contextual menu you can see on the screen shot on the left hand side of this paragraph.

 After you press delete you will see alarm is gone and you'll not be woken up by it again. Of course if you want to re-create the alarm perhaps when a holiday has finished then you go through the usual steps to create an alarm.

Tuesday, June 28, 2011

How to delete contacts from your Samsung Galaxy S2

So now you've got you're Samsung Galaxy S2 and all your friends numbers are on it but for whatever reason you and your friend have fallen out and you want to delete them from your contacts. To start to delete a contact we need to find them so press the "contact" app at a home screen and then find a contact you wish to get rid of. For this example we will be deleting Scott Graveson from the address book. I heard a nasty rumour that he's a fat ugly ginger virgin anyway.

When we've selected the contact you need to press the menu button on your Samsung Galaxy S2 to open up this small contextual menu. When this menu has popped up we select the delete option and then click on "OK" when the prompt comes up.

If we've accidentally selected the wrong person you will need to click "Cancel" to save your contact from being deleted from the phone. If you wish to re-add the contact have made up with them you will need to go through the typical stages of "adding a contact".

Of course simply deleting them from your contacts won't stop them from contacting you sadly but it will help stop you from leaving abusive messages on their answering phone or drunken texts.

Please note. Scott strongly denies being a ginger virgin though does accept he's fat and ugly.

Thursday, June 16, 2011

How to delete apps from a Samsung Galaxy S2

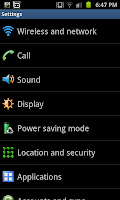
So you've downloaded an app on to your brand new Samsung Galaxy S2 and you don't like it, it's a bit rubbish or doesn't even work and now you want rid of it, but you don't know how. This guide will walk you right through the process starting from the settings screen. If you don't know how to get to the settings screen you need to click the menu button on the phone and then click on "Settings.

 The settings screen gives you a long list of of options (as you can see on the right) and you need to access the "Applications" option (which you can see at the bottom of the list on the right.

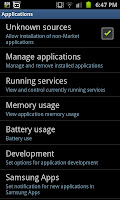
 When you open up the Applications part of the settings menu you come to the screen to the left with a list of sub settings. From here you can see lots of information though the option you need to access is "Manage applications" (the second choice from the top). This opens up a list of the applications you've got on the phone (look the the right of this paragraph) and although you may need to click on "All" along the top to find the app you want to delete they are easy to find (and listed alphabetically). In this example I'll be deleting the poor game "Droppa Lite" which I reviewed for the sister site (and gave a mere 12/50 and an E mark)
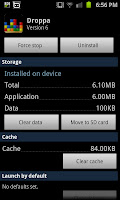
After finding the application you want to uninstall you need to click on it and then you will open up a new screen that looks something like the screen to the left. This screen has a lot of the applications details including the storage space used and allows you to move it to the SD card or, as you can see near the top, "Uninstall". By clicking on uninstall you take one step closer to taking the application off the mobile device.
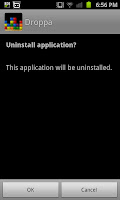
After pressing uninstall you will be taking to a new screen, this is the last chance you have to change your mind. If you still wish to uninstall the app from your Samsung Galaxy S2 (or any other android phone for that matter) you need to click "OK". If you've changed your mind however you need to click "Cancel" on the bottom of the screen. Within seconds of clicking "OK" the app will be deleted and you'll get a screen similar to the one below.
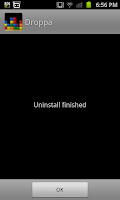
If you uninstall an application by accident then you can go back to the Android Market and download it again so it's no big worry if you do get the wrong one (though I seem to think that any save files your have for the game will also be deleted).

With other Android phones, most notably the HTC phones with small storage space you may want to know how to delete applications. The same method is applicable there too, thankfully due to the HUGE internal storage of the Samsung Galaxy S2 you will be unlikely to need to download to save space, though with the poor quality of some apps you will find a need to delete some.

Monday, May 23, 2011

How to Format a memory card with the Samsung Wave

 For this guide I'll be showing you how to format the memory card for a Samsung Wave. The phone it's self accepts either a MicroSD or a MicroSDHC memory card up to 16GB but the guide for formatting them is the same for both memory cards. You are advised by the manual for format them this way as doing it through a computer can cause incompatibility issues.

As with all the guides for the phone we'll start the home screen which looks something like this. If you have a settings widget you can cut out a few stages though we'll go the long way and start by pressing the menu button
 After pressing the menu button you will bring up a menu similar to this one. From here you want to click on the "Settings" icon which is in the bottom left hand corner and looks like a cog. In this image it's directly above "Keypad". This will open a long list of options for you to tinker with.


What you need to do on this screen is scroll down to the one that looks like a Pie Chart and is called "Memory". It's about 3/4 of the way to the bottom of the phone and is in a section which includes "Reset", "About Phone" and "Security".


 If you actually have a memory card in the phone you will see these options (if no memory card is present the first option won't actually show on this screen). It's the first option that was need to click on as it's the memory card we want to be formatting and not the phone's memory (which can be done via the bottom option of this menu).

 After clicking on the "Memory card details" screen you will see a screen similar to this. The details may be different (for example you might have named your memory card or it may have different numbers). If you look in the bottom left you will see a small button that says "Format", this is the button you need to click on.
After pressing "Format" you will see this screen. If you want to format you should click yes. Before you do this stage make sure if the card has ANYTHING on it that you want to keep, back it up before you format it. If you press "No" and go back you will be able to back up and copy the data on the card to either the phones internal memory on a computer. Remember anything on the card when it's formatted WILL be deleted.!

After this the card will be set up perfectly for your phone and for you to put music on it or use it to store your photographs. Now when you connect the phone to a computer you can click "Mass storage" to access the memory as well as "DRM media" to access the phones internal memory.

How do you clear the chat logs from a Samsung Wave?

 This guide for deleting chat logs begins at the home screen which looks something like this by default (though can be made to look very different depending on what you've done to the phone to personalise it). Whilst on this screen you need to press the "Dial key". The "Dial key" is the soft key on the left of the phone under the touch screen and is shown on page 19 of the of the phones manual.


 You will end up with a screen a bit like this (with out the black marks which have been used to hide numbers of the innocent). This will be a log of the calls and texts you've received. If you've saved the numbers as a contact their name will be displayed here (as seen by Vodafone) otherwise the number will show up. From here we want to click clear in the bottom left hand corner.
 After selecting clear this screen will pop up and you can either select them individually or select them all. You pick which option suits you, in this case I'll be deleting them all so I'll click on the "Select all" option near the top of the screen.
After selecting all, each of the boxes will get a blue tick in them to say they've been selected. If we click "Clear" again it will delete all of the selected numbers and names so you can clear your call log. The function of this is relatively limited though some folk don't like having a log whilst others just don't see the point in having one, though it can also stop you from accidentally calling someone back, which I'm sure we've all done at least once.