Showing posts with label Samsung. Show all posts

Monday, June 3, 2013

How to take a screenshot on a Samsung Galaxy S4

The brand new Samsung Galaxy S4, a phone that was released just a few short weeks ago may well be the next stage in the evolution of the Samsung Galaxy brand of phones but it's also a phone that is true to it's Samsung roots. With this in mind this tip is something many "Samsung fans" may already know, but for knew users this could be help.

A screenshot, as with a computer just takes a shot of your screen exactly as it is as that time, this allows you to show off your homescreens or do guides (like this!) or to troubleshoot an issue.

To take a screenshot on your new Samsung Galaxy S4 you need to go to whatever screen you want a shot of, for the sake of this article I'm using a homescreen (as you can see in the pictures).


When you're on the screen you want you need to press and hold both the "home" and the "lock" buttons at the same time. With in seconds of doing it you should see a message at the top of your screen saying "Saving Screenshot" (see picture).

If this has worked then you'll find the image stored on your phone in a folder called "Screenshots" which should it's self be in a folder called "Pictures".

You'll see this type of screenshots in almost every guide we do on this site due to how how clearly they show the details of the screens and we advise that if you have problems with your Samsung Galaxy S4 you take a screenshot of the issue and email us the picture and we'll try to solve the issue

Wednesday, September 5, 2012

Connecting a Samsung Galaxy S3 Smartphone to Wifi

One of the greatest features of modern smartphones is the fact the phones can be connected to Wi-Fi effectively giving you unlimited internet on your phone. Whether you're at work, at home or in somewhere like a Café you tend to be able to get access to a Wi-Fi system somewhere. So it seems to make sense to do a guide to show you how to connect to a Wi-Fi system on a Samsung Galaxy S3.

Firstly you need to go to the phones home screen then press the menu button. This will open up a menu like the one in the screenshot on the left. From this menu you need to select the bottom option "Settings".

After clicking on "Settings" you will see a huge list of options allowing you to change almost anything to do with the phone. Rather than scrolling up and down all the options you need to click on the "Wi-Fi". You will then be told to "Turn on the Wi-Fi". To do this you need to drag the grey circle beside "Wi-Fi" across until it turns into a green block.

After turning on your Wi-Fi you again need to click "Wi-Fi" which should do an automatic scan of the area and give you a list of available Wi-Fi connections (as well as storing any you may have previously used). If the phone doesn't do an automatic scan you will need to to select scan from the bottom of the screen to prompt the phone into doing a scan.

Hopefully when you were doing your scan you found the connection that you
are wishing to use, in my case the connection is the "SKYE18EB" connection, then click on that connection. If the connection then requires a password you will need to enter the password (see the screen shot on the right) an then click "connect".

After clicking on connect the connection should authenticate (if you enter the correct password) and then obtain an IP Address. After this has been done you should be able to connect to that connection at will (as long as it's in range). With your Wi-Fi connected you will be able to surf the net, watch videos, use facebook/twitter and anything else you would want to do online, often with a faster connection than the one you'd have via mobile internet.

Note-This guide should work with pretty much all phones running Android 4.0.4.

Thursday, August 9, 2012

How to access the test menu on a Samsung Galaxy S3


Despite the Samsung Galaxy S3 being a brand new piece of kit which has only been out for a matter of months, some people will have had issues with it. Thankfully Samsung have given us, the users, a chance to test the various features of our phones via their in built "Test menu", a feature that allows us to check that pretty much every part of our phone works in the correct manner.


 To access the test menu on the Samsung Galaxy S3 you need to open "Phone" app and dial "*#0*#". As soon as you dial the second "#" you will be taken to the Test menu (see the screenshot on the right) which allows you to test many of the features of the phone (as you can see on the right hand side).

Whilst many of the tests are rather complex, or boring a few of them are very interesting and useful. For example the "Touch" test gives you a chance to test that the touch screen works thoroughly, in fact even allows you to "pass" the test.

Despite some of the test being useful, I am a little bit perplexed as to how the "Sensor" test manages to, once again, feature this rather horrifying dog (which was also used in the Samsung Galaxy S3 in a similar manner). Despite it's haunting eyes the dog seems to serve little real purpose.

Whilst I hope no one needs to test their Samsung Galaxy S3 I assume that many will. This allows users to check if the fault is a hardware fault (for example an area of the screen that might be dead) or just an app that isn't working properly, so make sure to test the phone via the menu before taking it to the store.

Monday, July 30, 2012

How to take a screenshot on a Samsung Galaxy S3

Just over a year ago we did a guide looking at how to do screen shots with the Samsung Galaxy S2, now however the Galaxy S2 has been over taken as the Samsung flagship device by the Galaxy S3, the new Samsung super phone. We thought it would make sense to a similar guide to explain how to take screen shots (also known as "screen captures" or "print screens" with a Samsung Galaxy S3.

Firstly you need to go onto a screen that you want to capture. For most this will be
something like their homescreen or a screen that has something interesting on (perhaps high battery use or odd data use), for this example we're using a home screen.

Whilst on the screen you want to capture you need to press and hold the phone's "Home" button on the centre of the phone and the "Lock" (or power) button on the right hand edge of the phone for about 2 seconds. After holding the buttons the screen will flash for an instant and then you will get two messages-
1-On the status bar you will see a message saying "Saving screenshot..."
2-A second or so later a massage on the lower part of the screen will show "Copied to clip board"

After these messages you will be able to find your screenshots saved in the "Gallery" app in a folder called "Screenshots".

Note-For people who used the Samsung Galaxy S2 with Gingerbread, the technique is almost identical. If however you used the Samsung Galaxy S2 with the updated updated Ice Cream Sandwich (ICS) the technique is widely different.


Monday, June 20, 2011

How to put music on to shuffle with the Samsung Galaxy S2

 One of the questions I was recently asked about the phone was how do you play the songs on random mode or shuffle. Someone had told them that it wasn't possible with the default player, though I knew I'd managed to set it on to shuffle. Firstly you need to load up your music player. We are using the default "Music" app for this guide, though I know that other alternatives are out there.

The music app will look something like the screen to the right with a list of songs and bands. Sadly clicking the menu button here, which is how you'd expect to select shuffle mode, doesn't actually give you the option. What you need to do from here is select a track and load the track up so you get the song playing screen.

When you get a screen that looks something like this (it may show the album cover or a Visualization screen depending on how you've personally set it). Around the middle of the screen here you can see a "shaded" area with the running time (00:46 from 04:26 in this example) as well as the boxed A (with is the replay function) and on the left hand side you see two arrows. This is the shuffle mode. Just press it to select or deselect it.

Whilst this is easy enough it seems an over-sight not to have it accessible from just the menu buttons, though I think (I might be wrong) that this is an Android issue and not one exclusive to the Samsung Galaxy S2. If you want to play your songs randomly this is by far the easiest way to do it and doesn't involve needing to download any applications.

Saturday, June 18, 2011

How to get the most from the Samsung Galaxy S2 Battery

 We all know that the big problem with smartphones is the battery life. The fact of the matter is that we will almost certainly see ourselves needing to charge the battery on an almost nightly schedule. This however doesn't stop us from wanting to prolong the battery life. This little entry is going to look at how to prolong the life of a Samsung Galaxy S2, though the tricks and tips mentioned here can really be translated almost any phone on the market.

Firstly we'll go a screen that will be our immediate friend, the Power saving mode screen. To access this screen to the right you need to open up the settings (press the menu button then settings) and scroll down to the "Power saving mode" menu which should be the fifth option down.
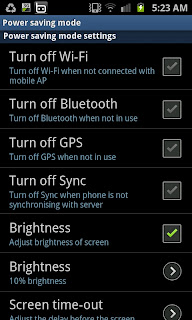

The first thing you want to do when you get to this menu is to press in the little box that allows you to enable "Power saving mode". This setting allows you to use all those other options that are below such as turning off things like GPS, Wi-Fi and Sync. The big one perhaps though is turning down the brightness of the screen to just 10%, especially if your indoors as this will save a lot of the life of the battery if your still using it. I would advise, if you're not using anything on the phone, to tick all the boxes and lower the brightness to 10%.
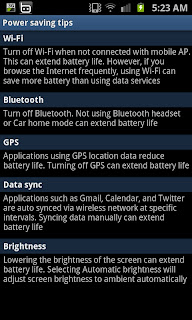
Further down the Power saving mode menu you will find a "Power saving tips" screen (that looks like the one to the right). This basically covers what I've already said though it misses a few other tricks you can use to prolong the battery in other ways.

First for your background try to use a stationary one (so not fishes swimming or fireworks) as an animated background uses up battery quicker than a still image. Another trick is to turn the sound off on the phone. This is a brilliant trick if you receive a number of texts and your phone is always buzzing. Although it can be an inconvenience each one of those noises takes a small portion from the battery.


Although we may not like to do this next thing we may need to. Put the phone down. Yes, I know that's hard but just hear me out. Every input the phone gets and every time the screen lights up, vibrates, or makes a sound drains the battery. If we are trying to preserve the battery only use it for the most necessary of things. Don't sit there taking photographs with the flash on or playing "The King of OX" as both with eat into the battery. In fact the fewer applications you can have running the better.

The final tip is to check your battery usage. To do this you need to open up the "Settings" then scroll down to "About phone" and click "Battery usage". You'll then see a screen similar to the one below which allows you to see what exactly is eating up your battery all the time. This is where you can start to make personalised changes. For example make fewer calls, or close certain programs (Opera was responsible for 2% of my battery usage and has been closed due to it). By looking at this screen and the Energy saving mode you can work towards getting as much from the Samsung Galaxy S2 battery as possible.

How to get the most from the Samsung Galaxy S2 Camera

With an 8MP auto focus still camera and an 1080p HD video camera on the phone (as well as a 2MP front facing camera for video calls) you may be astounded by just the raw numbers.So lets look at just how you can get the best pictures from the phone.

Although I'm no where near a professional photographer I'll just be giving you the quick tips to improve your photographs. These, on the whole, come from just tinkering with the phones inbuilt settings which can be found by pressing the "cog" icon on the phones "camera" screen.

The first setting you come across that you will want to learn about is is the "Scene mode". This allows you to set the phones settings to several default modes that help take pictures based on the surroundings. If you look at the image to the right you can see some of the "Scenes", and they are all suited to certain photographs. For example taking a picture of a persons face is best taken in the "Portrait" scene whilst a "Night" shot is taken in the dark and is a slower picture that can take a few seconds to take (but is extremely good quality as long as you don't shake the phone).

One of the absolute major settings is the "Resolution" setting. The best on the phone is the 8MP setting which has a resolution of 3264 x 2448 (and is the top one on the list you can see to the side) whilst the 0.3MP (640 x 480) is the lowest quality. For the best images take them on 8MP as they do look, a lot better than with the other settings.


 Another setting you will find yourself using an awful lot is the "White balance" setting. This is basically the setting for the type of lighting conditions you are in. The selection of the right setting here can turn a very good photo into an excellent one and is worth setting correctly every time.


The last key setting you will find yourself wanting to check is the "Image quality" setting. This, alongside "resolution", are arguably the two that make the biggest difference when taking images in good lighting conditions. A "Normal" image can show jagged edges at times especially when taking images that have smooth circular edges on them, "Superfine" however makes the edges of items look really well defined and is an essential setting.

As well as those mentioned above things likes "Flash", "Exposure value", "Focus mode" and a number of other settings are there for more experienced photographers to play with.

Thursday, June 16, 2011

How to delete apps from a Samsung Galaxy S2

So you've downloaded an app on to your brand new Samsung Galaxy S2 and you don't like it, it's a bit rubbish or doesn't even work and now you want rid of it, but you don't know how. This guide will walk you right through the process starting from the settings screen. If you don't know how to get to the settings screen you need to click the menu button on the phone and then click on "Settings.

 The settings screen gives you a long list of of options (as you can see on the right) and you need to access the "Applications" option (which you can see at the bottom of the list on the right.

 When you open up the Applications part of the settings menu you come to the screen to the left with a list of sub settings. From here you can see lots of information though the option you need to access is "Manage applications" (the second choice from the top). This opens up a list of the applications you've got on the phone (look the the right of this paragraph) and although you may need to click on "All" along the top to find the app you want to delete they are easy to find (and listed alphabetically). In this example I'll be deleting the poor game "Droppa Lite" which I reviewed for the sister site (and gave a mere 12/50 and an E mark)

After finding the application you want to uninstall you need to click on it and then you will open up a new screen that looks something like the screen to the left. This screen has a lot of the applications details including the storage space used and allows you to move it to the SD card or, as you can see near the top, "Uninstall". By clicking on uninstall you take one step closer to taking the application off the mobile device.

After pressing uninstall you will be taking to a new screen, this is the last chance you have to change your mind. If you still wish to uninstall the app from your Samsung Galaxy S2 (or any other android phone for that matter) you need to click "OK". If you've changed your mind however you need to click "Cancel" on the bottom of the screen. Within seconds of clicking "OK" the app will be deleted and you'll get a screen similar to the one below.

If you uninstall an application by accident then you can go back to the Android Market and download it again so it's no big worry if you do get the wrong one (though I seem to think that any save files your have for the game will also be deleted).

With other Android phones, most notably the HTC phones with small storage space you may want to know how to delete applications. The same method is applicable there too, thankfully due to the HUGE internal storage of the Samsung Galaxy S2 you will be unlikely to need to download to save space, though with the poor quality of some apps you will find a need to delete some.

Sunday, June 12, 2011

Deleting pictures from the Samsung Galaxy S2 (the Gallery method)

So we've got a new Samsung Galaxy S2 and used the camera to take a few shots with the brilliant 8MP camera....except they're just not very good pictures and now we're looking through them we actually don't want to keep them. We sit there for a second or two and ask ourselves how we go about deleting them. As with most things with modern day phones there is always more than 1 method but lets just look at the most simple method.

Firstly go to the Gallery app and then click on the “Camera” option. From here we can see all the photographs on the phone and we can easily find which picture or pictures we want to delete. From the gallery mode you should press the either the menu button or hold on one of the image. After doing one of those you will see a small set of options appear at the bottom of the the screen including “Share via”, “Delete” and “More”. What you need to do is select the photographs you want to delete (placing a green tick in the corner of them) then press on delete.

After pressing delete you will be asked to confirm your choice, click on “Confirm deletions” and the selected photographs will be deleted from the handset.

Of course there is other options to delete the images using things like Kies or windows explorer (and a computer/laptop) as well as deleting directly from the Camera app (if we decide the picture needs deleting immediately) though for most occasions using the gallery app is the best, the quickest and the easiest. 


 This picture shows the menus that we see on the Gallery screen, press on the images to select them
 In this picture you can see the confirmation prompt, to delete it you need to "Confirm deletion".

How to take Screen Captures with the Samsung Galaxy S2

Although it's not a necessity for most, some phone users do ask “is it possible to take a screen shot of my phone?”

The answer is simple. Most of the time it is indeed possible to take print screens or screen captures of mobile phones. Depending on the actual phone however you may need to find yourself doing very different things. Most phones require you to download a computer program and have the phone and computer connected by a USB cable to use your computer to take the screen capture. This is how many websites take the screen captures for things like phone reviews and showing off features.

Rather than looking at the overly complex system involved in what the programs do we will look at how Samsung phones take screen captures. This feature has been in the most recent Samsung's including the Samsung Wave and now the highly acclaimed Samsung Galaxy S2. The way the Samsung phones take screen shots, or as they are known by some as "screen captures" or even "print screens",  is incredibly simple and is actually an in-built feature that seems to be lacking in almost all the other phones.

By holding the “Home” button and pressing the “lock” button at the same time you will manage to use the secret “Screen capture” function of the phone which will take a print screen of the phone exactly how it is. The quality of this is far superior to using another phone (or camera) to take a picture and for people who want to use a picture of the screen this is an almost valuable tool.

If you are successful when you try the phone will vibrate and a message will appear on the phone saying “Screen captured. Saved as image file”. These image files can be found very easily on the phone by looking in the Screen Capture folder of the phone for use later on.

Quick tips:
If at first you find your phone locking or going to the menu just try again.
Hold the "home" button for a slight moment before pressing the lock button (to stop the phone from locking)

Hopefully this guide will help you take screen captures with your Samsung Galaxy S2 smartphone.

Edit:
I've noticed a few people finding this place through google (hi folks) with one person googling "Screen capture directory"

The directory will be something along the lines of Computer\GT-I9100\Phone\ScreenCapture when connected to a Windows 7 computer. On the phone by it's self they can be found in Gallery\ScreenCapture. Hope that helps you with making the screen capture function of the Samsung Galaxy S2 as useful as it is for me.

For those wanting to know about the quality of image from a screen capture all the pictures of the Samsung Galaxy S2 screens have been done via this method of screen capturing.

Friday, June 10, 2011

Samsung Galaxy S2 secrets

Whilst using the Samsung Galaxy S2 you may want to know what secrets the phone has and what little tricks we have to play with. Whilst the Samsung Galaxy S2 has a number of widely known features which are covered in the manual it also has a lot of hidden secrets that we can take advantage of.

Firstly the “Zoom” feature for the browser and gallery.
This is a trick that is featured in the manual and often comes up on the screen when we open a number of programs. To use it you need to place a finger on either side of the screen then tilt the phone up and down. This is a new function and one that is useful for some though using the “pinch” method is generally just as easy and a little bit more 
 “natural” to users.

Secondly is the “Print Screen” feature
This is a feature that has been carried over from some earlier Samsung's including the Samsung Wave. This is the method I get pictures for the site through and what you need to do is press the “menu” and the “lock” button at the same time. If you press them right the phone will vibrate then give a small message saying “Screen captured. Saved as image file.” These files will be stored in a folder called “ScreenCapture”.

The phone also had a shortcut to the "Task manager". The typical way of getting to the Task manager is through the application screen however if you hold down the "Home" button you get a list of the last few apps you've had open and an option to open the task manager. This saves a lot of time if you are wanting to find the task manager.

The phone also has a secret search function that appears if you hold the menu button on the homescreen and acts much like the "search button" on other android phones. This is something that very cleverly allows Samsung to take off the much maligned "Search" button and yet also have a search function. Clever lot these Samsung folk.


So some new things well...did you know that by using a tethered connection (guide here) you can actually use the phone as a Wi-Fi card allowing a computer without a Wi-Fi adapter to connect to a wireless hub inside your home!

If you slide your finger along the notification bar (the bar that has the clock and the signal bars on) you can change the brightness of the phone. If you slide your finger to the right you will make the screen brighter if you scroll it to the left you will darken the screen.

We've also found that the Samsung Galaxy S2 has a secret test menu that allows you to check if you're phone is in perfect working order with tests ranging from the Proximity sensor to checking the vibration and accelerometer.

And course we've also learned how to access that tricky to access 5.1. dolby surround sound now we've had a longer play with the phone.

Samsung Kies Air

One of the most useful things on the Samsung phones is the "Kies" system that Samsung have been using over the past few years. In the past it has been relatively limited and flawed though Samsung have completely re-done the system and for the Samsung Galaxy S2 they've implemented a new version. The "Kies air" system completely re-writes the system and turns it into one of the most useful tools on any Smartphone today. If we open it by clicking on the icon we get to use a PC to play with the files on the phone.


After we open the app we see this screen here which basically tells us what we need to know about the app. It's a program that doesn't require any computer software, it doesn't require any cables and as long as you have a wifi network set up you can access you entire phone via your laptop or PC.

To start you click start at this screen then get given an IP address to type into your internet browser.

 When the app has been accessed and you've got the IP address from this screen here you need to type it into your browser. From here you will know whether your connection is active and what network you are connected to. To stop the app at anyone point you merely need to click on "Stop".


When you've typed your address into the internet browser you will see something like this come up which effectively allows you to access all the files you've put on the phone. This allows you to download files to the phone or upload them from the phone as well as deleting files, calls, documents and texts. It really is such an amazing piece of kit that you will find yourself using a lot especially if you lose your USB cable...


The system is amazing and once you get used to it you'll realise just how revolutionary and how slick it is.

Thursday, June 9, 2011

Connecting a Samsung Galaxy S2 Smartphone to Wifi

 Although you may not have a home screen that is identical to this is, we are using this screen as the starting place in this guide to connecting your brand new Samsung Galaxy S2 to a local wi-fi router, such as those you may have in your own home. In this particular example I'll be connecting it to my own home wi-fi which is a BT Home Hub.
 From the homescreen we want to open the settings menu and to do that we need to open up the menu on the phone. To get up the small menu which can be seen at the bottom of this picture you need to press on the phones "Menu" button then click settings.
 When you have opened the settings menu you will find a lot of options. Although you will no doubt by playing around with the options one day to connect to your wi-fi you need to quite predictably click on "Wireless and network".

 The wireless and network settings open up a screen like this, from here you need to go to "Wi-Fi settings". This will search for all the available wi-fi connections in the local area which include some password protected and some open connections. Although, again, you will be back on this screen down the line for a number of reasons, just concentrate on opening up the Wi-Fi settings for now.


As you can see here there is a list of connections available, some are password protected  (as indicated by a small padlock on the BTHomeHub connections) whilst others are open connections (in this case the BTFon and BTOpenzone connections which are a different kettle of fish themselves).
If you click on a connection for the first time this screen will come up where you enter your password. The password, on most "hubs" can typically be found on the back of the actual hub or with a card sent to the individual. After you enter the password you can connect that that connection and the phone should memorise all the details for the future.


When you are connected you you should see the icon of the network you are on change colour slightly and the message "Connected" appear under it. If your on your home connection you will be allowed to use as much of the internet as you wish to use (or up to the data allowance of your home ISP) for free. Though if you are connecting to a public connection a number of rules apply.

Whats in the box: Samsung Galaxy S2

When you get a new phone you want to know what you are actually getting. What else comes in the box along with the device? Some old Sony Ericsson's for example came with a USB memory card reader for the phones memory card (though I'm not sure which phone it actually was, I think it was the K700i as we certainly had one floating around the house).

With the Samsung Galaxy S2 what we find in the box is the handset, the battery, as well as a mains charger, a USB Mini cable, the manual, hands free kit and replacement heads for the hands free earphones. By it's self the boxed stuff isn't amazing in quantity and personally I'd say it misses out on a memory card (though the phones huge internal memory of 16GB means that this isn't as big a loss as it could have been with other phones) though what you do get is incredibly high quality. Also if you order your phone with Vodafone you currently get a Pirates of the Caribbean box set containing the first 3 films in the smash hit franchise, a lovely added bonus thanks to Vodafone.

Whilst I will have a proper review done in the coming weeks after a real play with the phone, what I've already found out from using it is that the handset is simply amazing. The phone is fast, it's responsive, it's clear, the camera is simply brilliant, the video recording ability is wonderful and although I had reservations about the TouchWiz interface it's been nothing short of a pure delight to use. Whilst the boxed stuff does perhaps lack one or two things you will really need to go some to fill the internal memory before you get the chance to get yourself a memory card and due to the wonderful Kies air system the phone uses there isn't an excuse to leave too much lingering on the phone.

After just a few days of playing with it I've yet to find a single flaw with the phone and at the rate we're going I'm merely becoming more and more impressed. This really is a dream handset.

Tuesday, June 7, 2011

...excitement over the Samsung Galaxy S2...

With my handset arriving in the next 14 hours I've had to devise a small list of what I want to do with the device first...so here we go:
Film my beautiful girlfriend stripping in glorious HD- An obvious choice but also the best way to check out the video ability.
Watch bbc iPlayer- Yet to have a phone that's been able to do this so it's a feature I can't wait to use, and I'll be making the most of my 3GB total internet allowance!
Go to the beach and try out the camera- Living just 5 minutes walk from the beach this seems almost the best way to check out the 8mp camera.
Try out the office software- As a writer this was one of the most appealing things about the phone and allows me to work with out the need for my laptop

I'm sure there will be more but this is it for now.

Monday, May 23, 2011

How to set a different theme on your Samsung Wave Cell Phone

 As with all the guides we start with the home screen the press the menu button the phone to open up the menu. With this guide in particular try and remember what the home screen looks like as it'll look very different by the end of this piece.
 From the menu screen you need to click on "Samsung Apps", it's in the top right hand of this image, though for some users it will be in a different place depending on how you like your menu screens. As with the homescreen this will look pretty different after you've set a different theme.
 In the Apps menu you need to either "search" for a theme or click category and find one. This guide will be done via the Category option as it makes this easier and more simple.
 The category screen looks something like this, you need to scroll down to find "Theme" as can be seen below.
 As I'm a cheapskate I've gone for the ones that are "Free"and picked a few to try. From here they may end up on a menu screen and need installing as well as downloading (though it seems not all of them do need installing).

 After you've downloaded your themes you will need to go back to the menu screen and then enter the settings menu (see left) from here you need to click on "Display and light" and open the the menu's in there.
 In the "Display and light" menu you need to click on "Theme" and you'll find the themes you've downloaded. By default there is only the "Default theme" though after you've downloaded a few more themes you'll be able to select one of those.
 This is the screen that will show all your themes, as you can see I've only actually downloaded 2 on to the phone (and kept the default) so my options here are quite thin though. One of these options is is "cyberpunk" which is what you'll see on the screenshots below which are hugely different to the way the screen looked to begin with.
 
 This is the new homescreen with the "Cyberpunk" theme set, as you can see the homescreen image is different and the icons at the bottom have also changed. Even the icons on menu scree have mainly changed as you can see in the image below. To change the theme back you can easily go back to the "Display and light" menu and select the default one or any other ones.